Description:
In this project we can detect Carbon Monoxide and flammable gases using MQ9 Gas Sensor. A KY-016 RGB LED Module is used to show output in different colours. If a gas is detected, then the RGB LED Module goes Red, Buzzer goes brrrrrr, relay switches and turns ON the electrical device you connected, for example we have used a Bulb (The bulb we use daily in our house). Bulb can be seen from far away so humans can understand that some sus gas is out on loose. You can attach other electrical devices too instead of bulb. Arduino UNO is used to control everything.
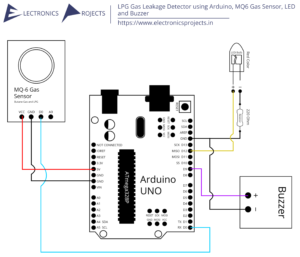
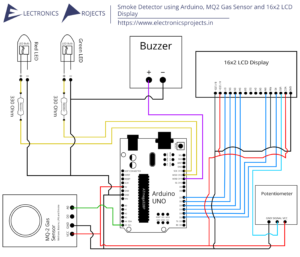
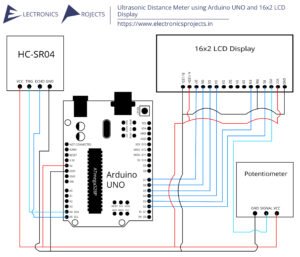
Circuit Diagram:

Components:
| SR. NO. | COMPONENT | PINOUT DIAGRAM | BUY |
|---|---|---|---|
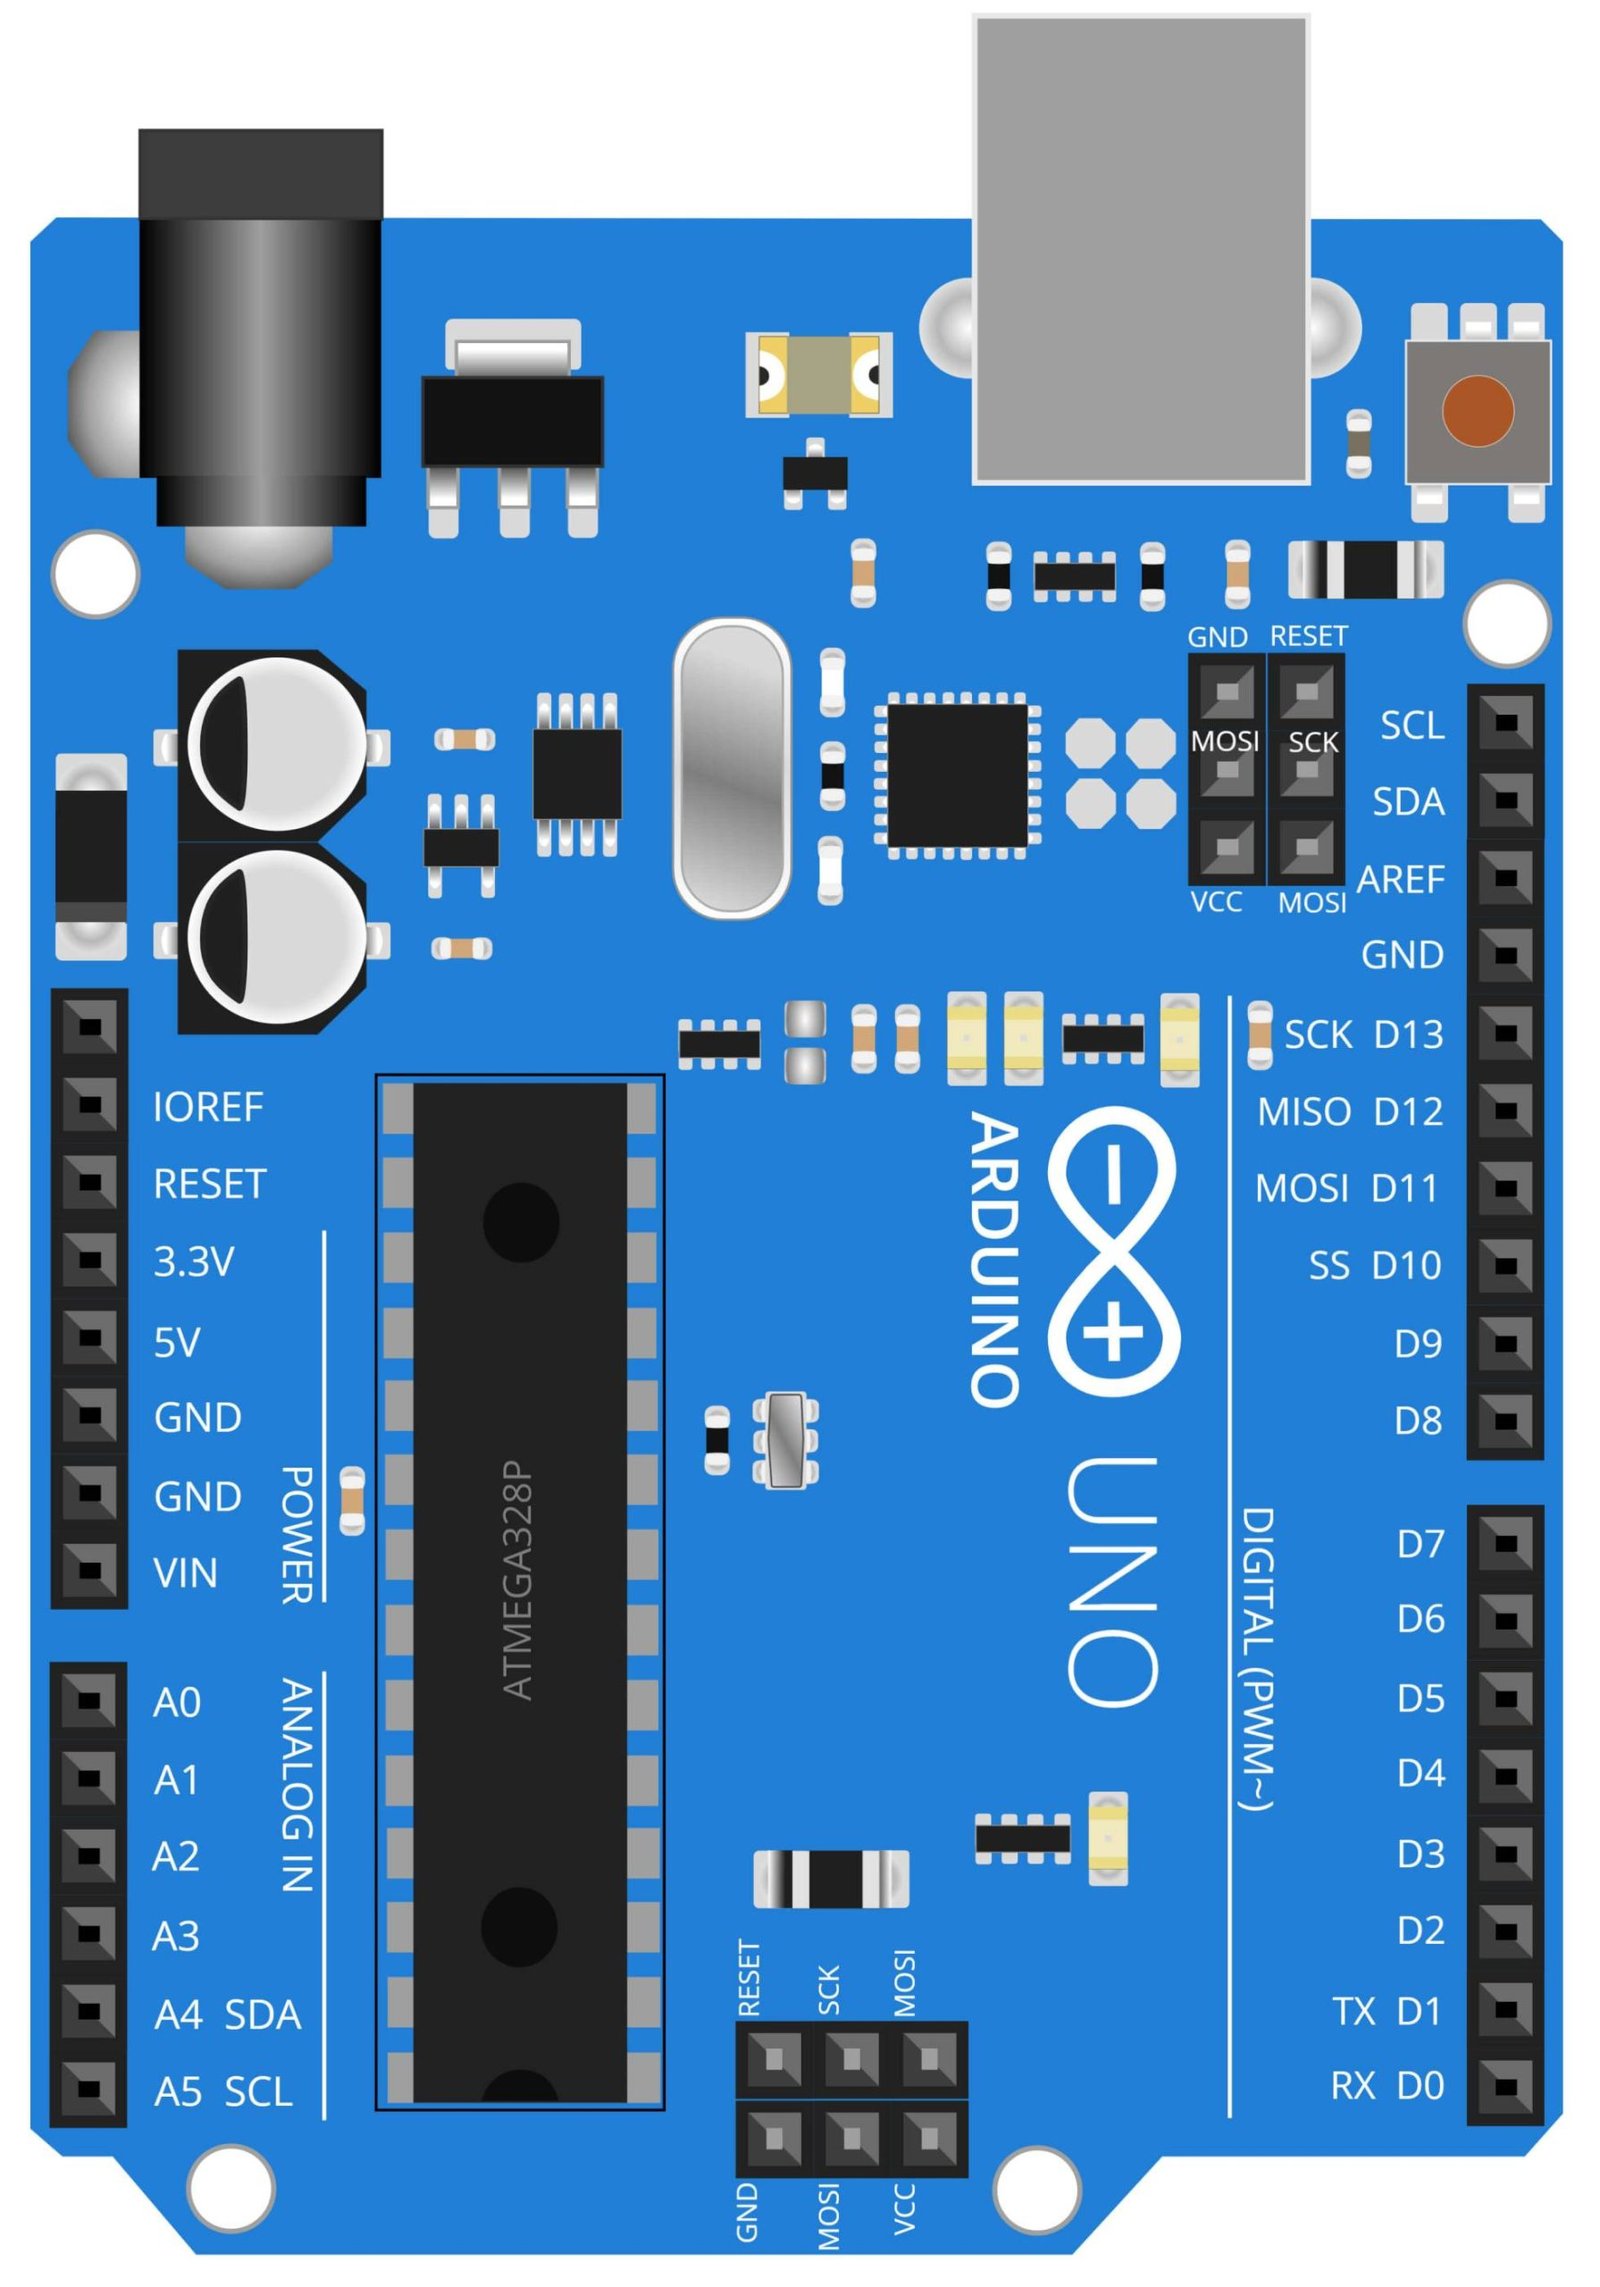
| 1 | Arduino UNO (Other Arduinos can be used too) | Arduino UNO Pinout Diagram⇗ | |
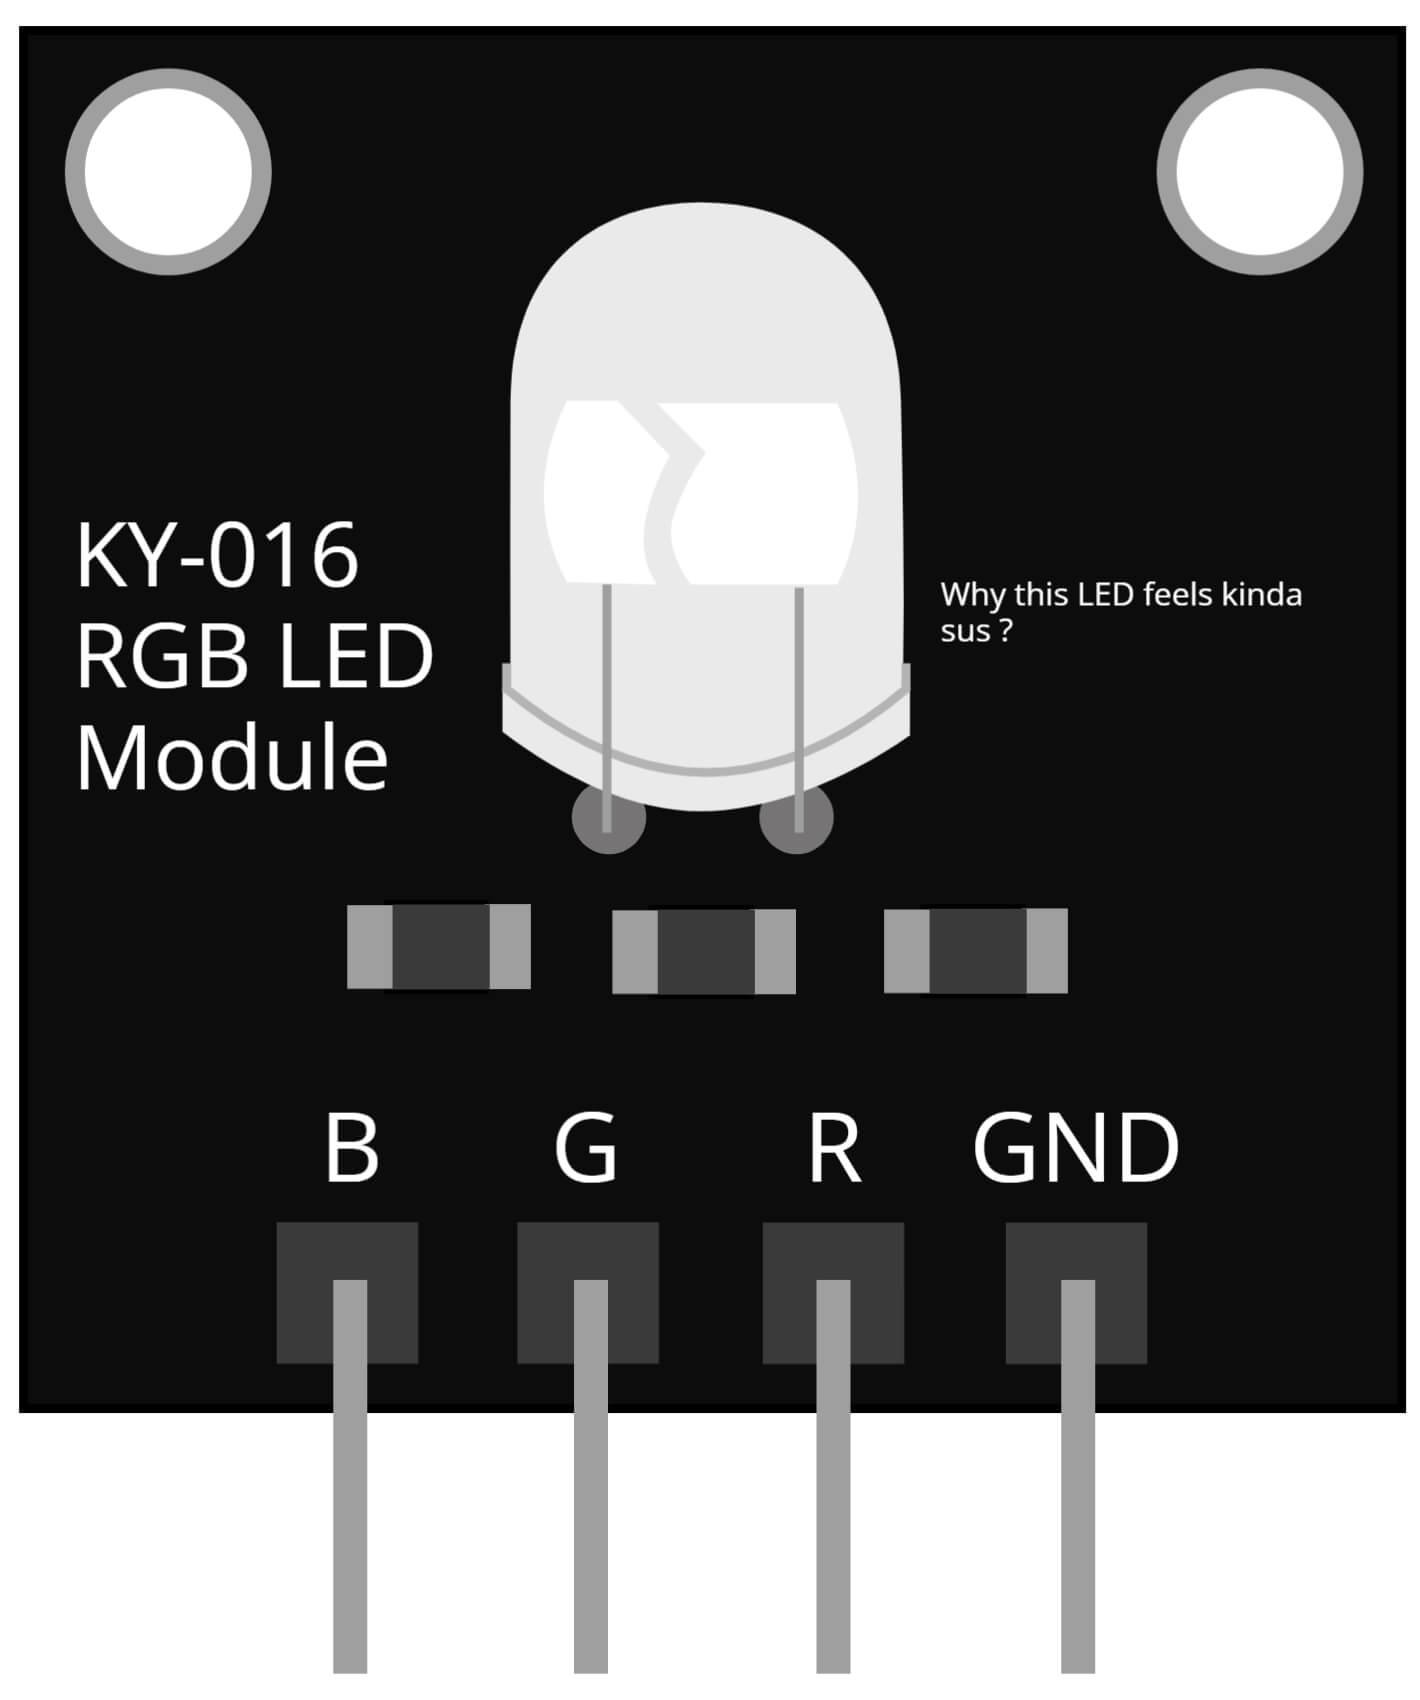
| 2 | KY-016 RGB LED Module | ||
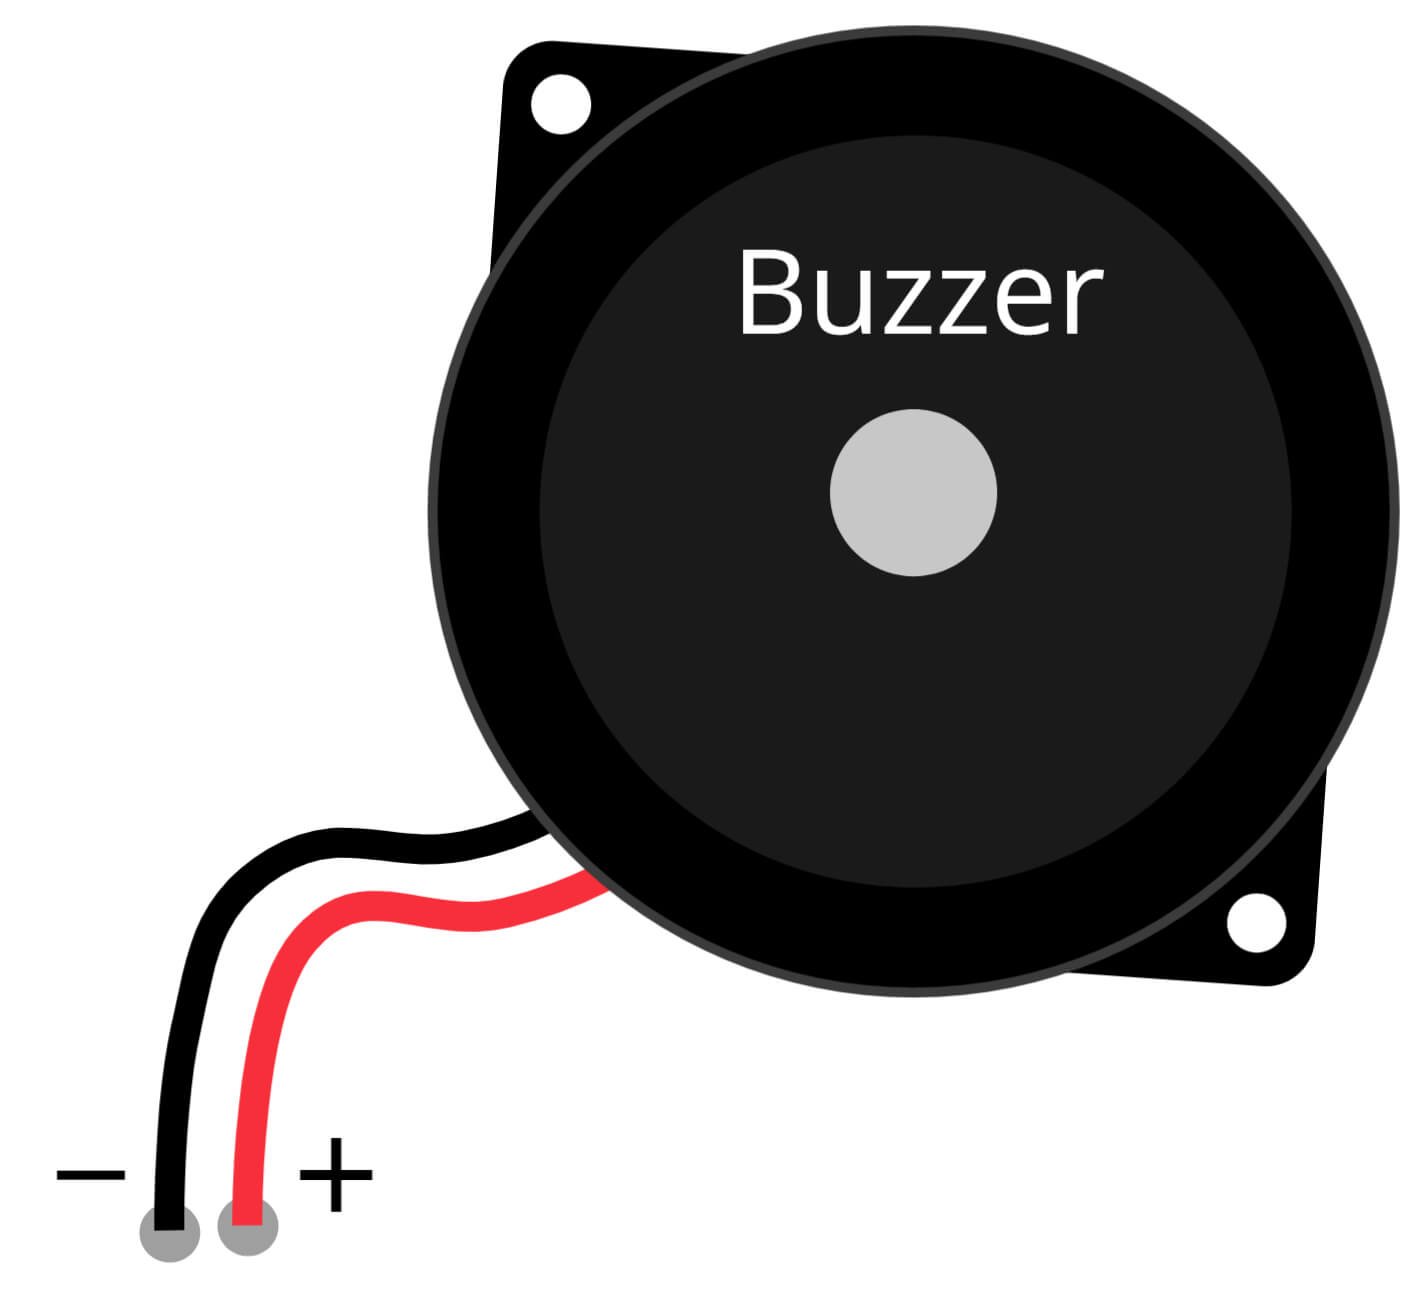
| 3 | Buzzer | ||
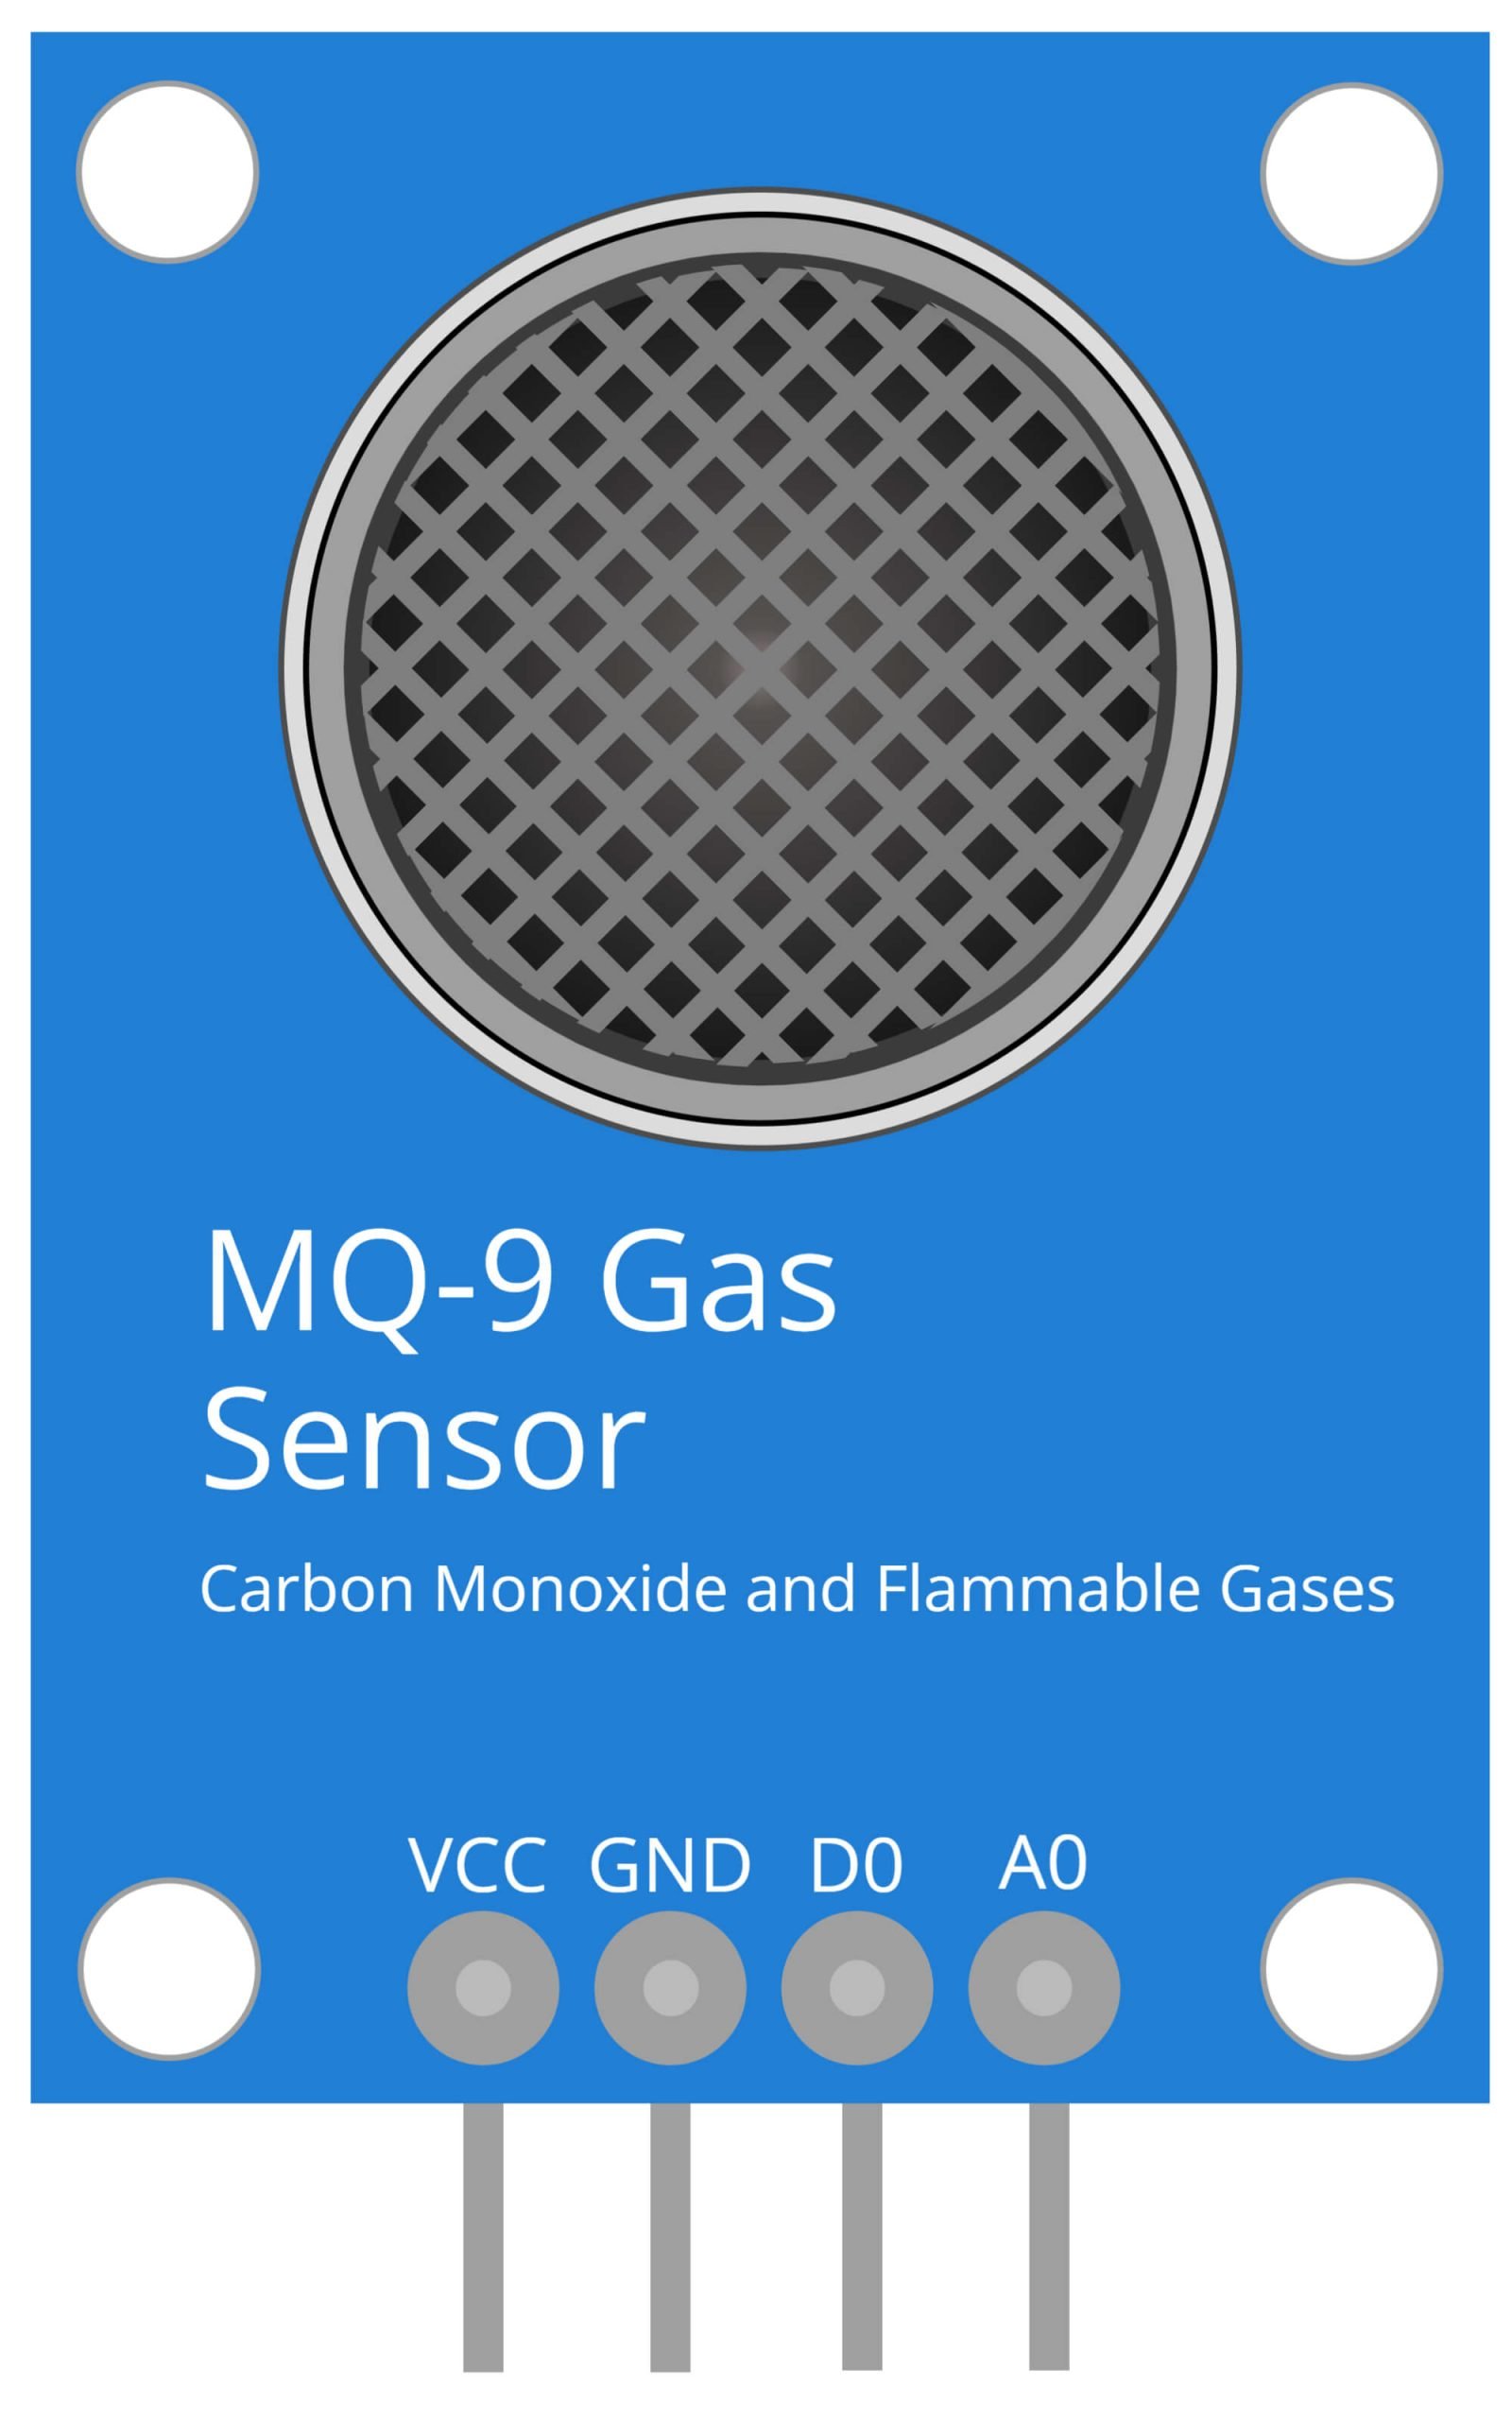
| 4 | MQ9 Gas Sensor | MQ9 Gas Sensor Pinout Diagram⇗ | |
| 5 | Single Channel or Double Channel Relay Module | ||
| 6 | The Bulb we use everyday | ||
| 7 | That 2 Pin Plug we use everyday |
Arduino UNO
The Arduino UNO is a popular microcontroller board that is widely used in various DIY and maker projects. It is based on the ATmega328P microcontroller and comes equipped with 14 digital input/output pins, 6 analog inputs, a 16 MHz quartz crystal, a USB connection, a power jack, an ICSP header, and a reset button. The board can be powered by a 9V battery or through the USB cable. The Arduino UNO is an open-source hardware platform, which means that users are able to modify and distribute the device.
In this project, the Arduino UNO serves as the brain of the device. It processes the data from the MQ9 gas sensor, which detects the levels of carbon monoxide and flammable gases in the air, and controls the RGB LED to indicate the levels of the detected gases. The RGB LED is used to give visual indication of the gas levels, for example, if the gas level is high, the LED will turn red, if the gas level is low, the LED will turn green.
KY-016 RGB LED Module
The KY-016 RGB LED Module is a multi-color LED module that is commonly used in Arduino projects. It consists of a common cathode RGB LED, which means that all the three LEDs (red, green and blue) share a common cathode pin. The module also includes three separate anode pins for each of the LEDs, which allows for individual control of the red, green, and blue components of the LED. This feature makes it possible to create a wide range of colors by varying the intensity of each LED.
In this project, the KY-016 RGB LED Module serves as a visual indicator of the gas levels. The module is connected to the Arduino UNO, which processes the data from the MQ9 gas sensor and controls the RGB LED to indicate the levels of the detected gases. For example, if the gas level is high, the LED will turn red, if the gas level is low, the LED will turn green. The RGB LED module allows for a clear visual indication of the gas levels, making it easy for users to quickly determine if their environment is safe.
MQ9 Gas Sensor
The MQ9 gas sensor is a widely used gas sensor that is specifically designed to detect carbon monoxide and flammable gases. It is a metal oxide semiconductor (MOS) type gas sensor, which uses a small heating element and a catalytic metal oxide layer to detect the presence of gases. The sensor has a high sensitivity to carbon monoxide and flammable gases, making it an ideal choice for detecting these gases in a range of applications.
In this project, the MQ9 gas sensor is used to detect the levels of carbon monoxide and flammable gases in the air. The sensor is connected to the Arduino UNO, which processes the data from the sensor and controls the RGB LED to indicate the levels of the detected gases. The MQ9 gas sensor works by measuring the resistance between its two pins, the resistance changes when the sensor is exposed to the gases and this change in resistance is then converted into a voltage or digital signal that can be read by the microcontroller.
Buzzer
A buzzer is an audio signaling device that produces a loud, continuous sound. It is widely used in a variety of applications, including alarms, timers, and warning systems. Buzzers are available in different forms, including piezoelectric and electromagnetic types, and can be triggered by a variety of signals, such as a voltage or a digital signal.
In this project, the buzzer is used as an audio signaling device, that produces a loud, continuous sound when the levels of carbon monoxide and flammable gases in the air exceed a certain threshold. The buzzer is connected to the Arduino UNO, which processes the data from the MQ9 gas sensor, and triggers the buzzer when the gas level is high. The buzzer provides an additional warning to the users, in addition to the visual indication provided by the RGB LED, making it more likely for the users to take notice and take necessary action.
Steps and Info:
1. Get correct components as given. You can buy online or offline. I buy electronics components mostly from Amazon.
2. Start connecting the components. If you are new to connecting components in an electronic circuit, then use a Breadboard or you can straight up make connections using Jumper wires but it will create problem when there will be two or more connections needed at one pin (for example two or more different sensors 5V connection to Arduino’s 5V pin). But before soldering components on a PCB or printing a PCB for your circuit, better try using breadboard so that any errors and mistakes can be observed on breadboard and not after soldering. Or do connections in your way.
3. Now after building the circuit, download the Arduino IDE from https://www.arduino.cc/ website.
4. If you are new to Arduino IDE software, then watch this video we made specially for beginners about Arduino IDE.
5. If you know Arduino IDE then straight up copy the code we given and paste it into the Arduino IDE sketch.
6. Connect the Arduino to your Computer/device. Select a proper port, proper Arduino type and whatever other settings are. Here it is Arduino UNO. (If you don’t know what this all is then watch our video: ).
7. Compile the code and Upload it.
8. If any error occurs then try to troubleshoot it by finding/copy-pasting it into our Solve Errors page https://electronicsprojects.in/solve-errors/, or you can straight up paste the error on Internet and you know the rest. Also check if there are no spelling/syntax errors in the code. Compile the code again once to check if errors are fixed. I have given proper connections and code but still nothing is perfect.
9. Once code compiles and uploads smoothly, you can start testing the working of your circuit/project.
10. Take Carbon Monoxide or any Flammable gas near the MQ9 Gas sensor. The sensor will detect the gas which will turn ON the LED, Buzzer and the electrical device (here Bulb) connected to the relay.
11. If it doesn’t work, then check connections and code. Also you can talk with me and the community through discord. All the links to social is given at the right side of this page.
12. NOTE: So the Flammable gases are flammable, they ignite instantly if they come in contact with fire or even a tiny spark. So work safely and cautiously. Don’t bring any fire source near the gas.
Program Code:
/* https://www.electronicsprojects.in Carbon Monoxide and Flammable Gases Detector using Arduino, MQ9 Gas Sensor and KY-019 RGB LED */

const int REDLED = 2;
const int GREENLED = 3;
const int BLUELED = 4;
const int MQ9 = A5;
int RELAY = 8;
int BUZ = 13 ;
int MQ9Sensor = 0;
void setup() {
Serial.begin(9600);
pinMode(REDLED, OUTPUT);
pinMode(BLUELED, OUTPUT);
pinMode(GREENLED, OUTPUT);
pinMode (BUZ, OUTPUT);
pinMode (RELAY, OUTPUT);
}
void loop() {
MQ9Sensor = analogRead(MQ9);
if (MQ9Sensor >= 100)
{
digitalWrite(REDLED, HIGH);
digitalWrite(GREENLED, LOW);
digitalWrite (BUZ, HIGH) ;// buzz
delay(50);
digitalWrite (BUZ, LOW) ;
delay(50);
digitalWrite (BUZ, HIGH) ;
delay(50);
digitalWrite (BUZ, LOW) ;
delay(50);
digitalWrite (BUZ, HIGH) ;
delay(600);
digitalWrite (BUZ, LOW) ;
delay(600);
digitalWrite (BUZ, HIGH) ;
delay(50);
digitalWrite (BUZ, LOW) ;
delay(50);
digitalWrite (BUZ, HIGH) ;
delay(50);
digitalWrite (BUZ, LOW) ;
delay(50);
digitalWrite (BUZ, HIGH) ;
delay(300);
digitalWrite (BUZ, LOW) ;
delay(300);
digitalWrite (BUZ, HIGH) ;
delay(50);
digitalWrite (BUZ, LOW) ;
delay(50);
digitalWrite (BUZ, HIGH) ;
delay(50);
digitalWrite (BUZ, LOW) ;
delay(50);
digitalWrite (BUZ, HIGH) ;
delay(50);
digitalWrite (BUZ, LOW) ;
delay(50);
digitalWrite (RELAY, LOW);
}
Else
{
digitalWrite(GREENLED, HIGH);
digitalWrite(REDLED, LOW);
digitalWrite (BUZ, LOW) ;
digitalWrite (RELAY, HIGH);
}
Serial.print("Sensor Check = " );
Serial.println(MQ9Sensor);
delay(69);
}