
In this tutorial, we will provide step-by-step instructions on Interfacing LM393 Speed Sensor with Arduino UNO, programming the Arduino to count pulses from the sensor, and calculating the speed of rotation. The final result will be displayed on an OLED display, providing real-time speed data in meters per second and kilometers per second format. This guide is suitable for beginners and those with some experience in electronics and programming, making it a valuable resource for hobbyists, makers, and professionals.
Components:
| SR. NO. | COMPONENTS | PINOUT DIAGRAM | BUY |
|---|---|---|---|
| 1. | Arduino UNO | Arduino UNO Pinout Diagram ⇗ | |
| 2. | LM393 Speed Sensor | ||
| 3. | 0.96 Inch SPI OLED Display | ||
| 4. | BO DC Geared Motor | ||
| 5. | Wheel with Holes | ||
| 6. | 9v Battery |
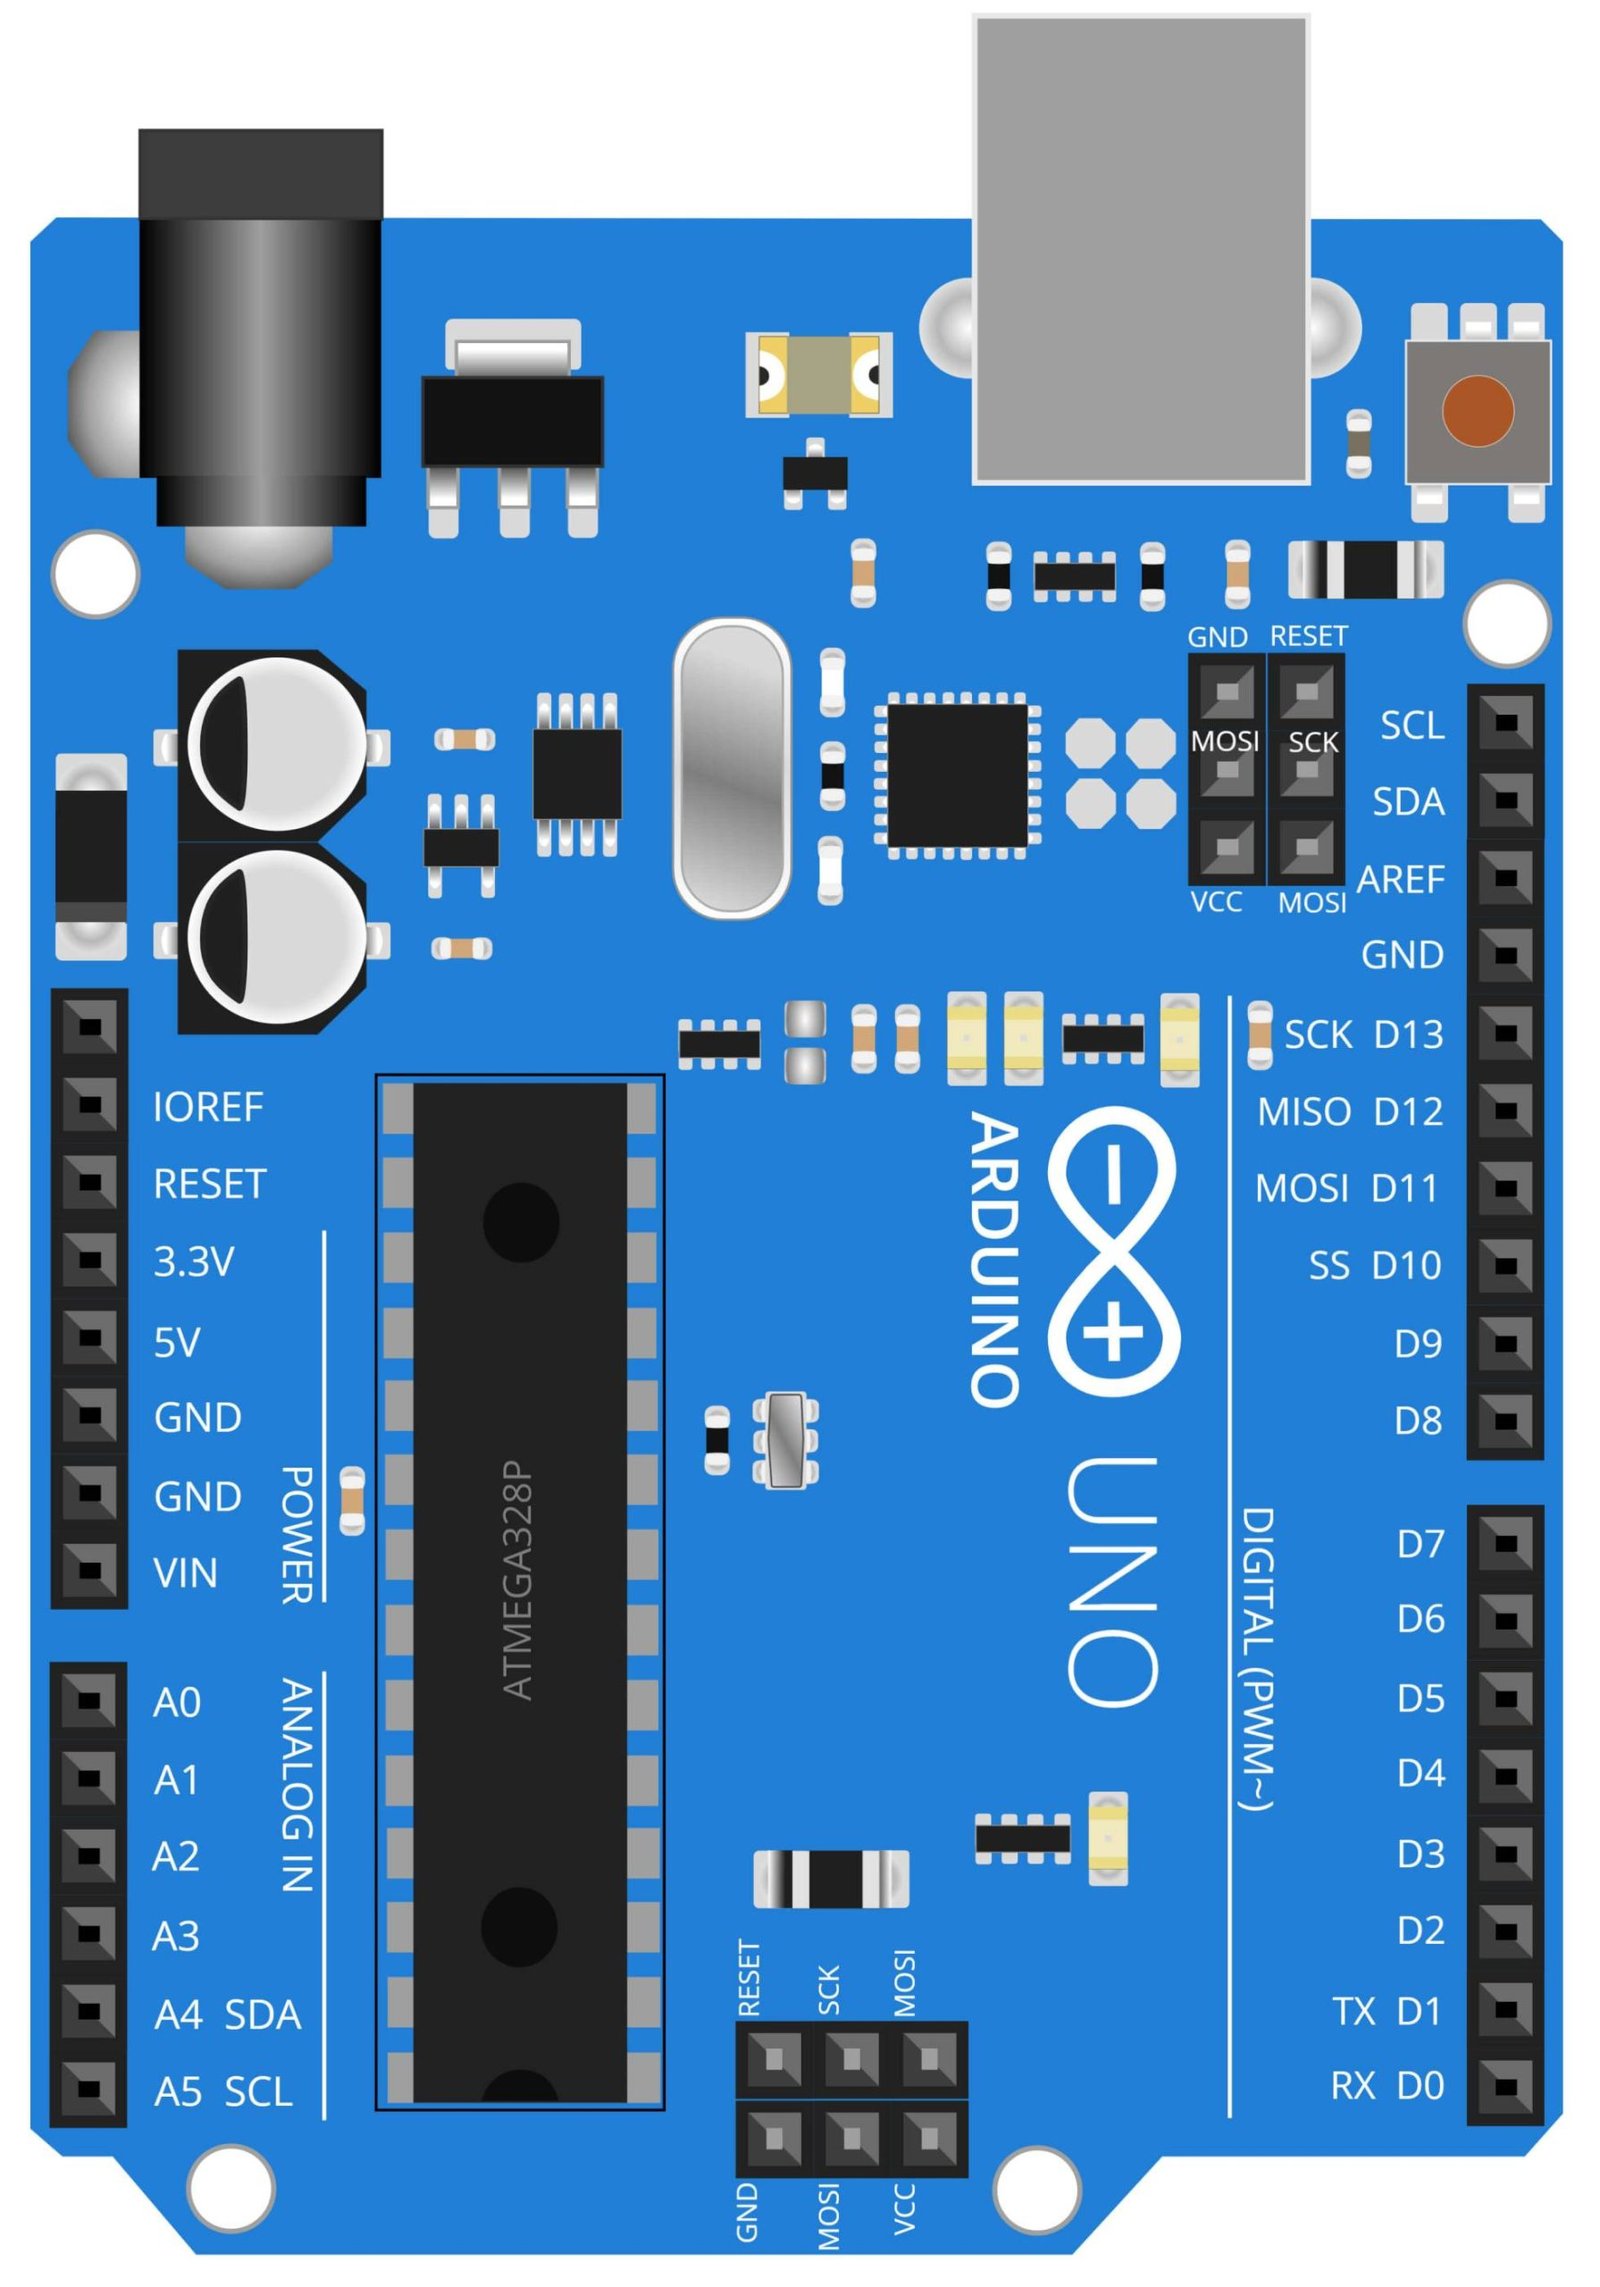
What is Arduino UNO?
Arduino UNO is a microcontroller board based on the ATmega328P. It is an open-source platform that is widely used for electronics projects, from simple hobby projects to complex industrial applications. The Arduino UNO is compatible with a wide range of sensors, actuators, and other electronic components, making it a versatile tool for prototyping and building custom systems. The board has 14 digital input/output pins, 6 analog inputs, a 16 MHz quartz crystal, a USB connection, and an ICSP header. The board operates at 5V and supports a wide range of voltage levels, making it easy to connect to various types of sensors and actuators. The board can be programmed using the Arduino Integrated Development Environment (IDE), which provides a simple and user-friendly interface for writing and uploading code to the board. With its simple programming language and large community of users, the Arduino UNO makes it easy for anyone to get started with electronics and programming.
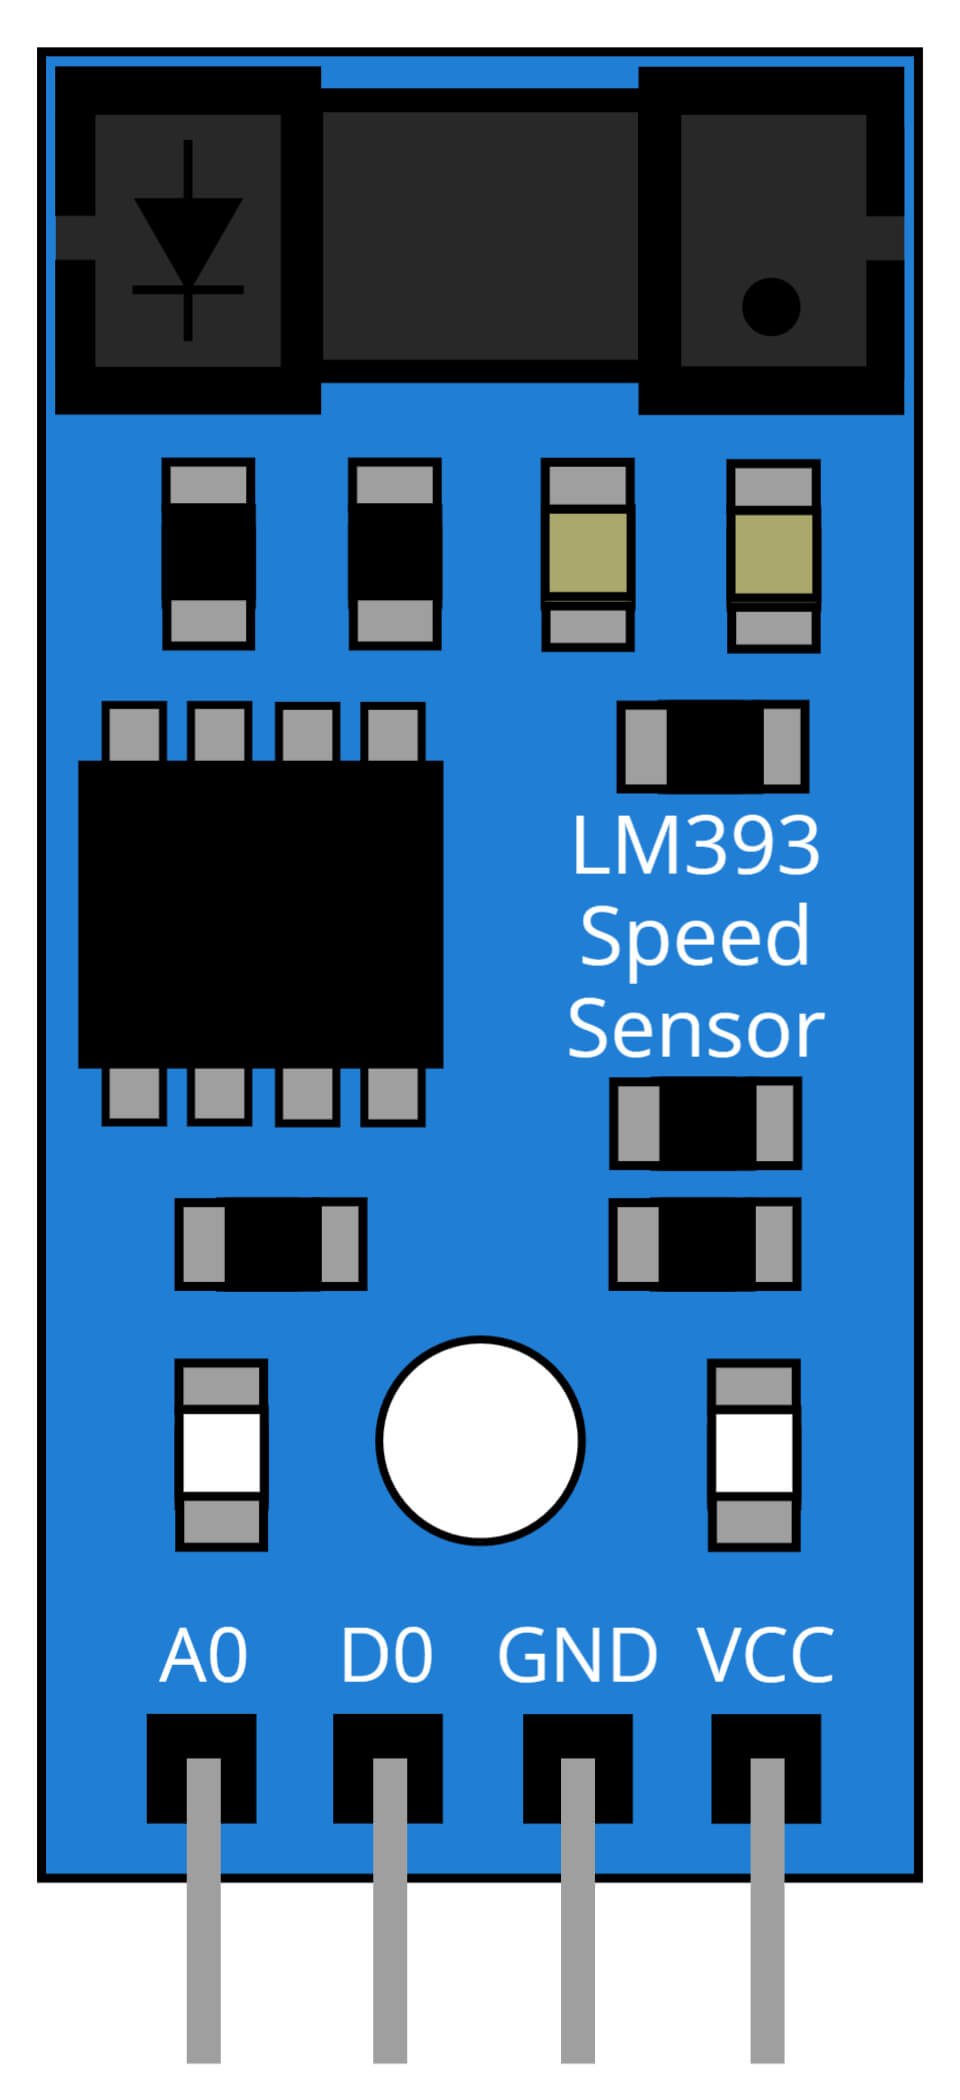
What is LM393 Speed Sensor?
The LM393 Speed Sensor is a device used for measuring the speed of a rotating object. It is commonly used in applications such as speed detection for wheels, motors, or any other rotating object. The sensor consists of a phototransistor and an infrared LED that are positioned on opposite sides of the rotating object. When the object rotates, it interrupts the infrared light beam between the phototransistor and the LED, causing a pulse signal to be generated. By counting the number of pulses over a set period of time, the speed of the rotating object can be calculated.
The LM393 Speed Sensor is typically connected to an external microcontroller, such as an Arduino board, to measure the pulse signals and perform the necessary calculations. The sensor operates at a supply voltage of 5V and has a low-level output signal of 0V. The frequency of the output signals is proportional to the speed of the rotating object, making it easy to calculate the speed by counting the number of pulses in a set time period. The LM393 Speed Sensor is a low-cost and reliable solution for measuring speed, making it a popular choice for a wide range of applications.
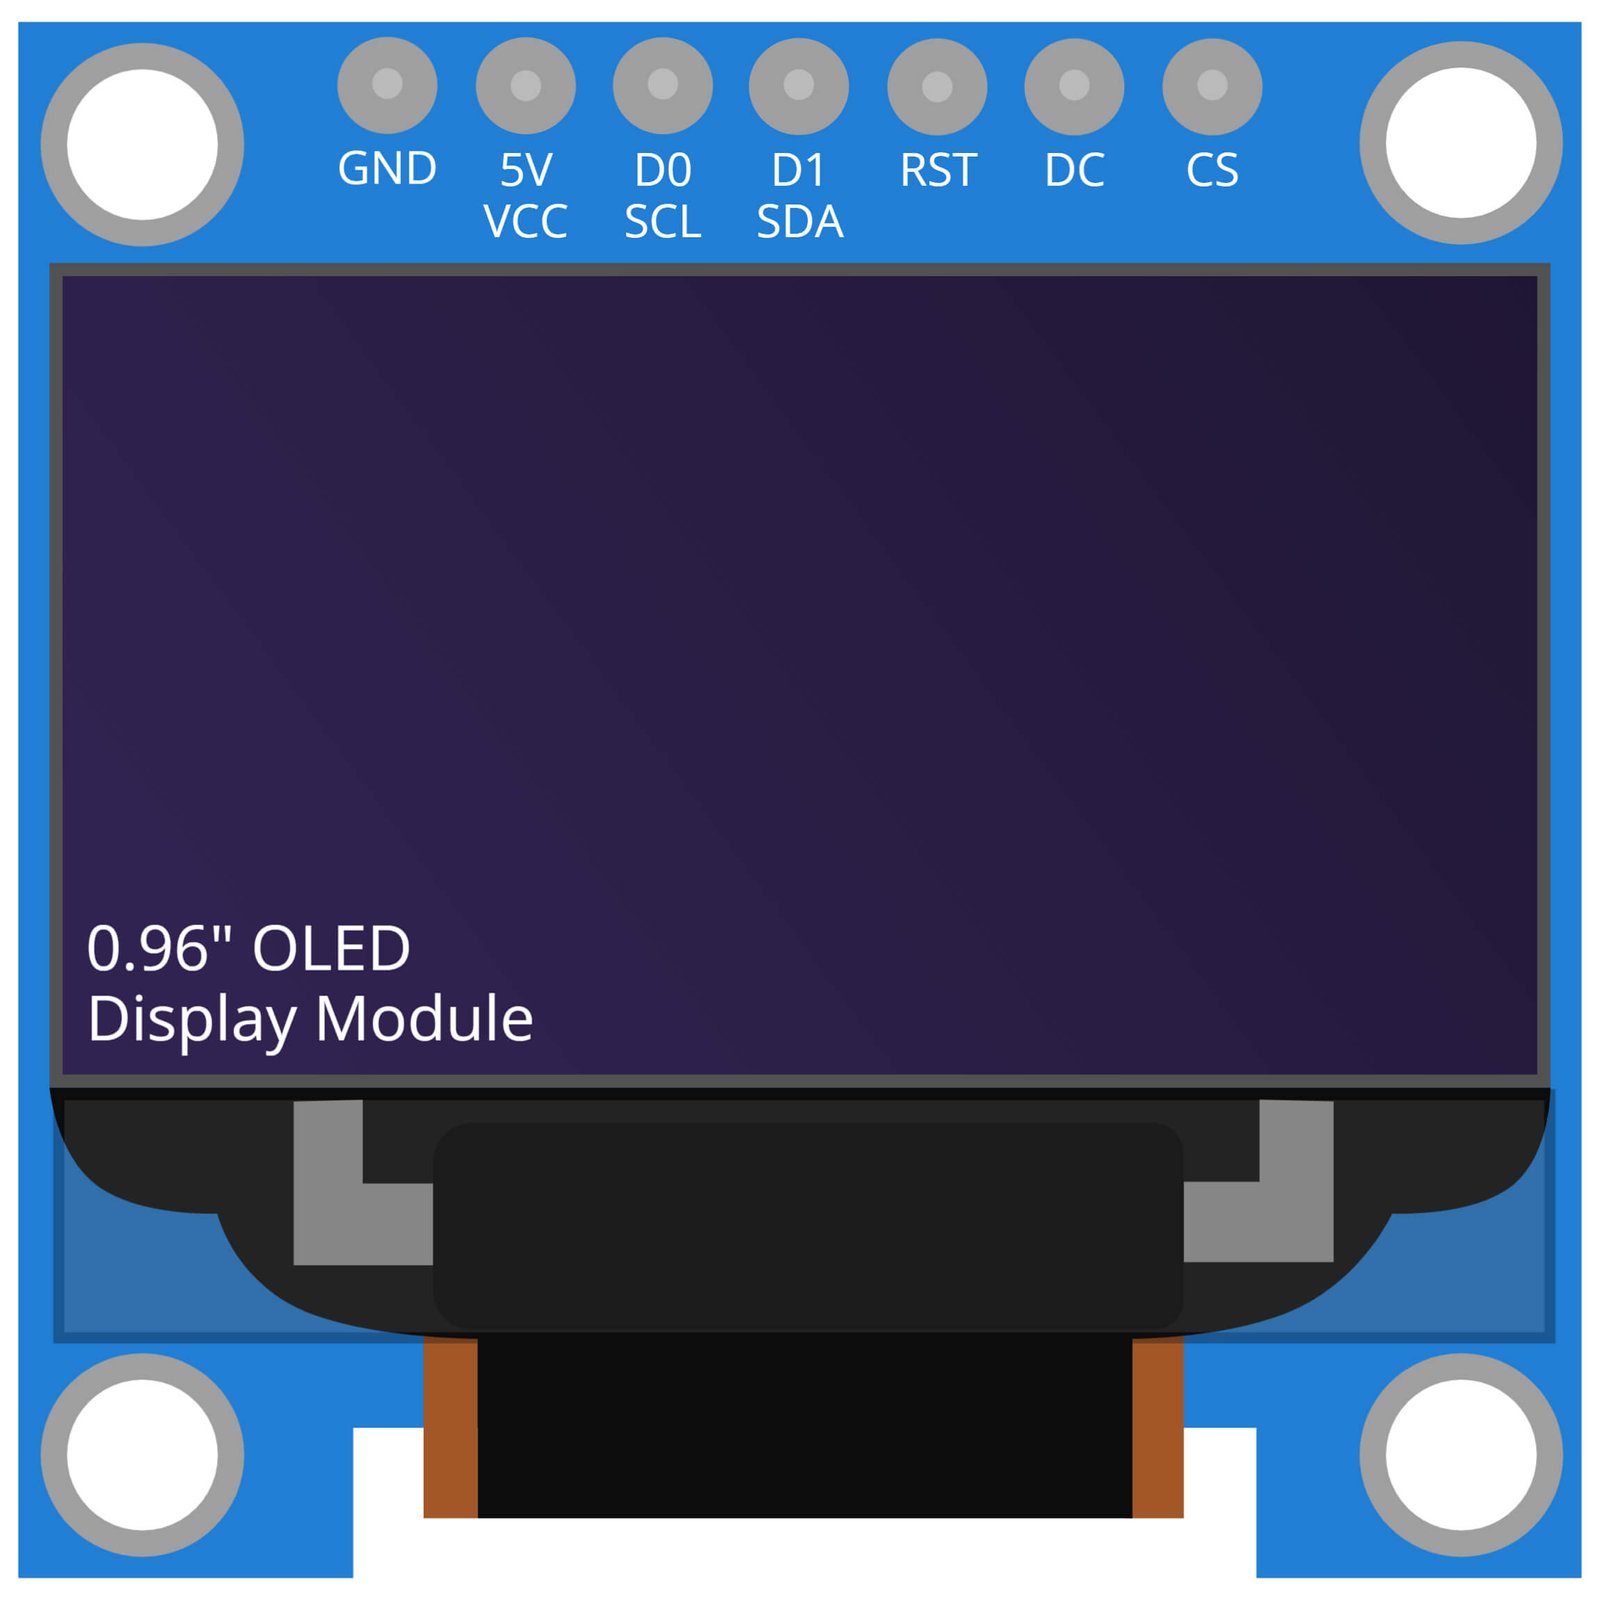
What is 0.96 Inch OLED Display?
The 0.96 inch OLED display is a type of organic light-emitting diode (OLED) display that is commonly used for small, compact electronic devices and projects. OLED displays are known for their high contrast, fast refresh rate, and low power consumption, making them ideal for applications where size and power consumption are critical factors. The 0.96 inch OLED display has a diagonal screen size of 0.96 inches and a resolution of 128 x 64 pixels, making it suitable for displaying text, graphics, and simple animations.
The 0.96 inch OLED display is typically connected to a microcontroller, such as an Arduino, through a serial peripheral interface (SPI) or I2C interface. This allows the microcontroller to control the display and send data to be displayed on the screen. The OLED display is also equipped with a simple, easy-to-use library that provides a set of commands for controlling the display, such as setting the contrast, text color, and background color.
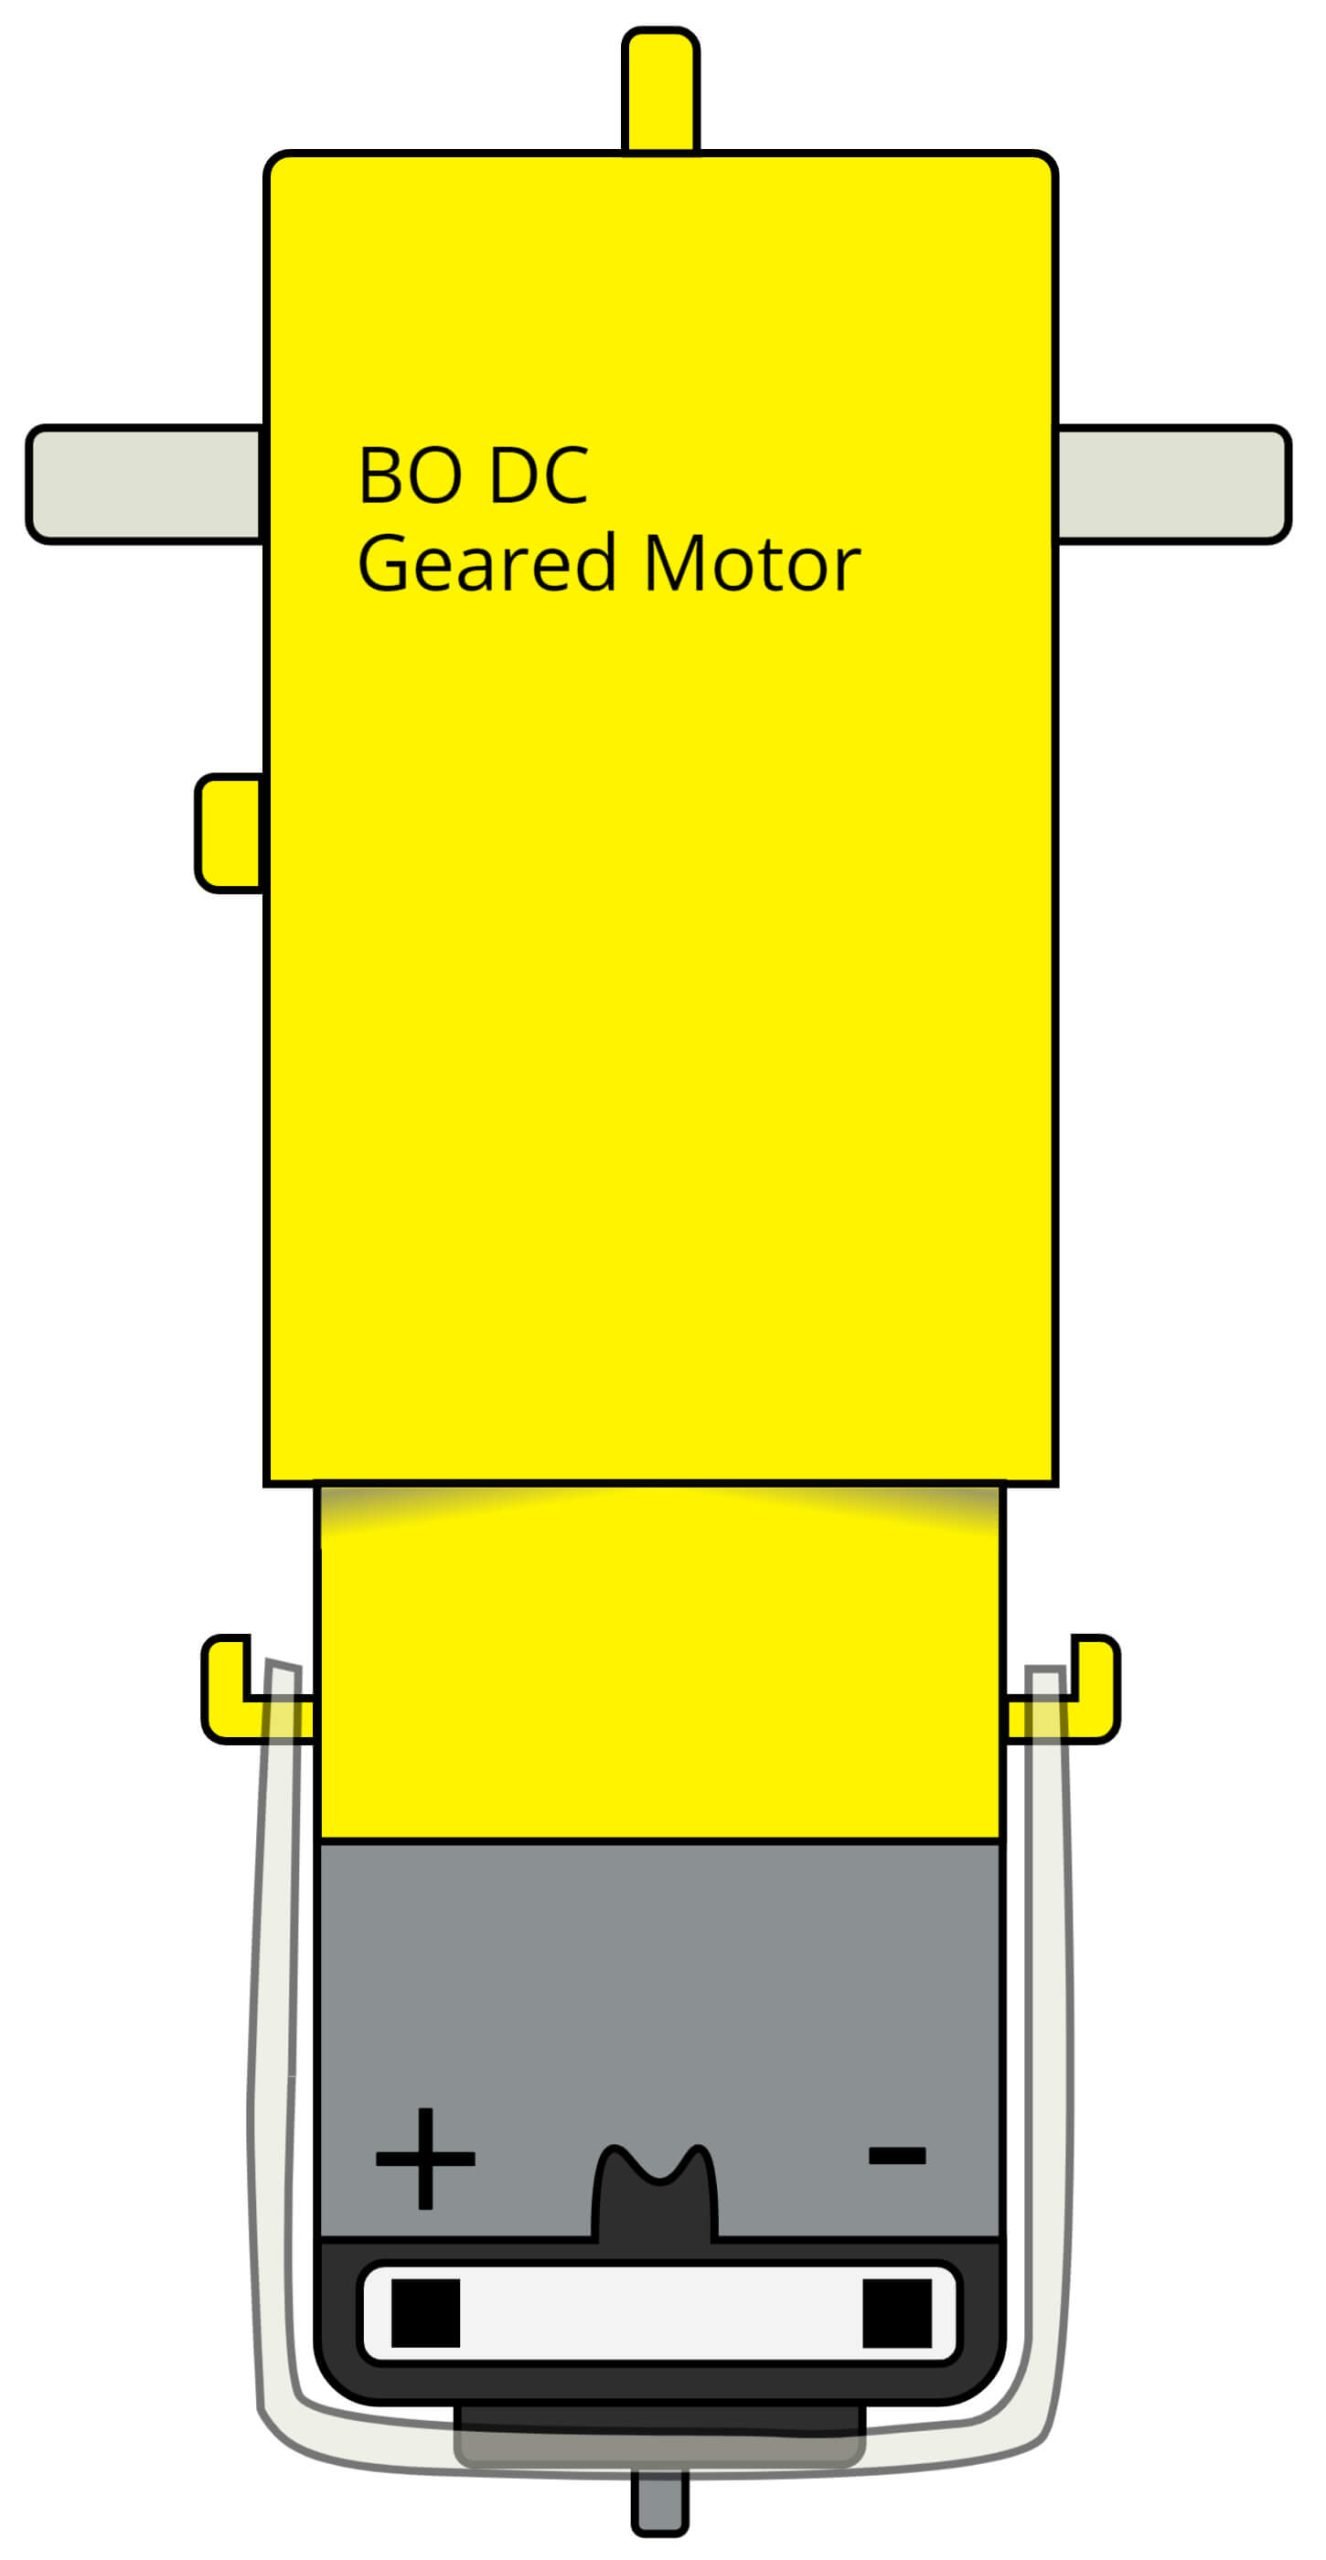
What is BO DC Geared Motor?
A BO DC Geared Motor is a type of direct current (DC) motor that is equipped with a gear reduction system. The gear reduction system helps to increase the torque output of the motor while reducing its speed, making it well-suited for applications where high torque is required at low speeds. BO DC Geared Motors are widely used in robotic and automation applications, where precise and controlled movement is required.
These motors are typically composed of a DC motor, a gearhead assembly, and a metal gear train. The gearhead assembly and gear train help to reduce the speed of the motor, providing the necessary torque for a specific application. BO DC Geared Motors can be controlled using a microcontroller, such as an Arduino, allowing for precise and flexible control over the motor’s speed and direction. They are available in a variety of sizes and gear ratios, making it easy to select the right motor for a specific application.
Interfacing LM393 Speed Sensor with Arduino UNO:

Program Code:
const int sensorPin = 2; // Pin that the sensor is connected to
volatile int rpm = 0;     // Speed in RPM

void setup() {
  Serial.begin(9600);      // Start serial communication
  pinMode(sensorPin, INPUT); // Set the sensor pin as an input
  attachInterrupt(0, rpmCounter, RISING); // Attach interrupt 0 to the RPM counter function
}

void loop() {
  rpm = 60 * 1000 / (millis() - lastTime) * intervals;

  // Convert RPM to meters per second
  float metersPerSecond = (2 * 3.14 * wheelRadius * rpm) / 60; // Add the radius of wheel instead of wheelRadius
  Serial.print("Speed (m/s): ");
  Serial.println(metersPerSecond);

  // Convert meters per second to kilometers per hour
  float kilometersPerHour = metersPerSecond * 3.6;
  Serial.print("Speed (km/h): ");
  Serial.println(kilometersPerHour);

  delay(1000);
}

void rpmCounter() {
  static unsigned long lastTime = 0;
  static unsigned int intervals = 0;
  intervals++;
  lastTime = millis();
}
Explanation:
Note that you need to define the value of wheelRadius (in meters) to calculate the speed in meters per second. This code also assumes that you have a spinning wheel connected to a motor that is being sensed by the speed sensor. The interrupt is triggered each time the sensor detects a rising edge (the wheel passes the sensor), and the rpmCounter function increments the count of intervals and updates the last time the interrupt was triggered. The loop() function calculates the speed in RPM, meters per second, and kilometers per hour and displays the results on the serial monitor.
Note: Don’t forget to measure the radius of your wheel and then add it into the code.
Note: Keep only 1 Hole in your wheel.
Interfacing LM393 Speed Sensor with Arduino UNO and 0.96 Inch SPI OLED Display:

Program Code:
#include <SPI.h>
#include <Wire.h>
#include <Adafruit_GFX.h>
#include <Adafruit_SSD1306.h>

#define OLED_RESET 4
#define OLED_DC 5
#define OLED_CS 6
#define OLED_SDA 4
#define OLED_SCL A5
Adafruit_SSD1306 display(OLED_RESET, OLED_DC, OLED_CS, OLED_SDA, OLED_SCL);

#define SPEED_SENSOR_PIN 2

float wheelRadius = 0.15; // add your own wheel radius here
volatile int pulseCount = 0;
unsigned long lastTime = 0;
float speed = 0;

void setup() {
  Serial.begin(9600);
  pinMode(SPEED_SENSOR_PIN, INPUT);
  attachInterrupt(digitalPinToInterrupt(SPEED_SENSOR_PIN), countPulses, RISING);
  display.begin(SSD1306_SWITCHCAPVCC);
  display.clearDisplay();
}

void loop() {
  if (millis() - lastTime >= 1000) {
    detachInterrupt(digitalPinToInterrupt(SPEED_SENSOR_PIN));
    speed = (pulseCount / 20.0) * wheelRadius * 3.6;
    pulseCount = 0;
    attachInterrupt(digitalPinToInterrupt(SPEED_SENSOR_PIN), countPulses, RISING);
    lastTime = millis();
  }
  display.clearDisplay();
  display.setTextSize(2);
  display.setCursor(0, 0);
  display.println("Speed (km/h):");
  display.println(speed, 1);
  display.println("");
  display.println("Speed (m/s):");
  display.println(speed / 3.6, 1);
  display.display();
}

void countPulses() {
  pulseCount++;
}
Explanation:
Note: For this one you will need to install this library:
1. Adafruit_SSD1306.h 2.Adafruit_GFX.h 3. SPI.h 4. Wire.h
And here also you need to define the value of wheelRadius (in meters) to calculate the speed in meters per second