Description:
In this project we build a CO2 Monitor using Arduino and SEN0219 Gravity Infrared CO2 Sensor. The sensor detects CO2 in PPM (Parts Per Million) and output is displayed on 0.96″ SPI OLED Display. Everything is controlled using Arduino Nano (Other Arduinos can be used too).
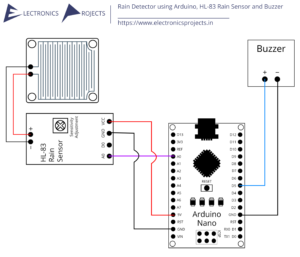
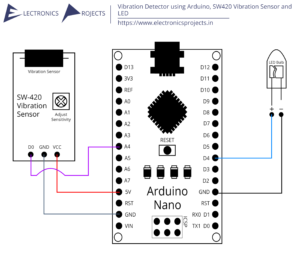
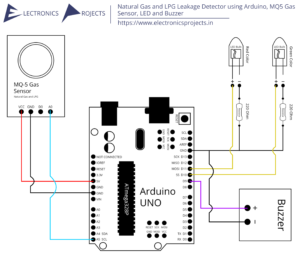
Circuit Diagram:

Components:
| SR. NO. | COMPONENT | PINOUT DIAGRAM | BUY |
|---|---|---|---|
| 1 | Arduino Nano (Other Arduinos can be used too) | ||
| 2 | 0.96″ SPI OLED Display | ||
| 3 | SEN0219 Infrared CO2 Sensor |
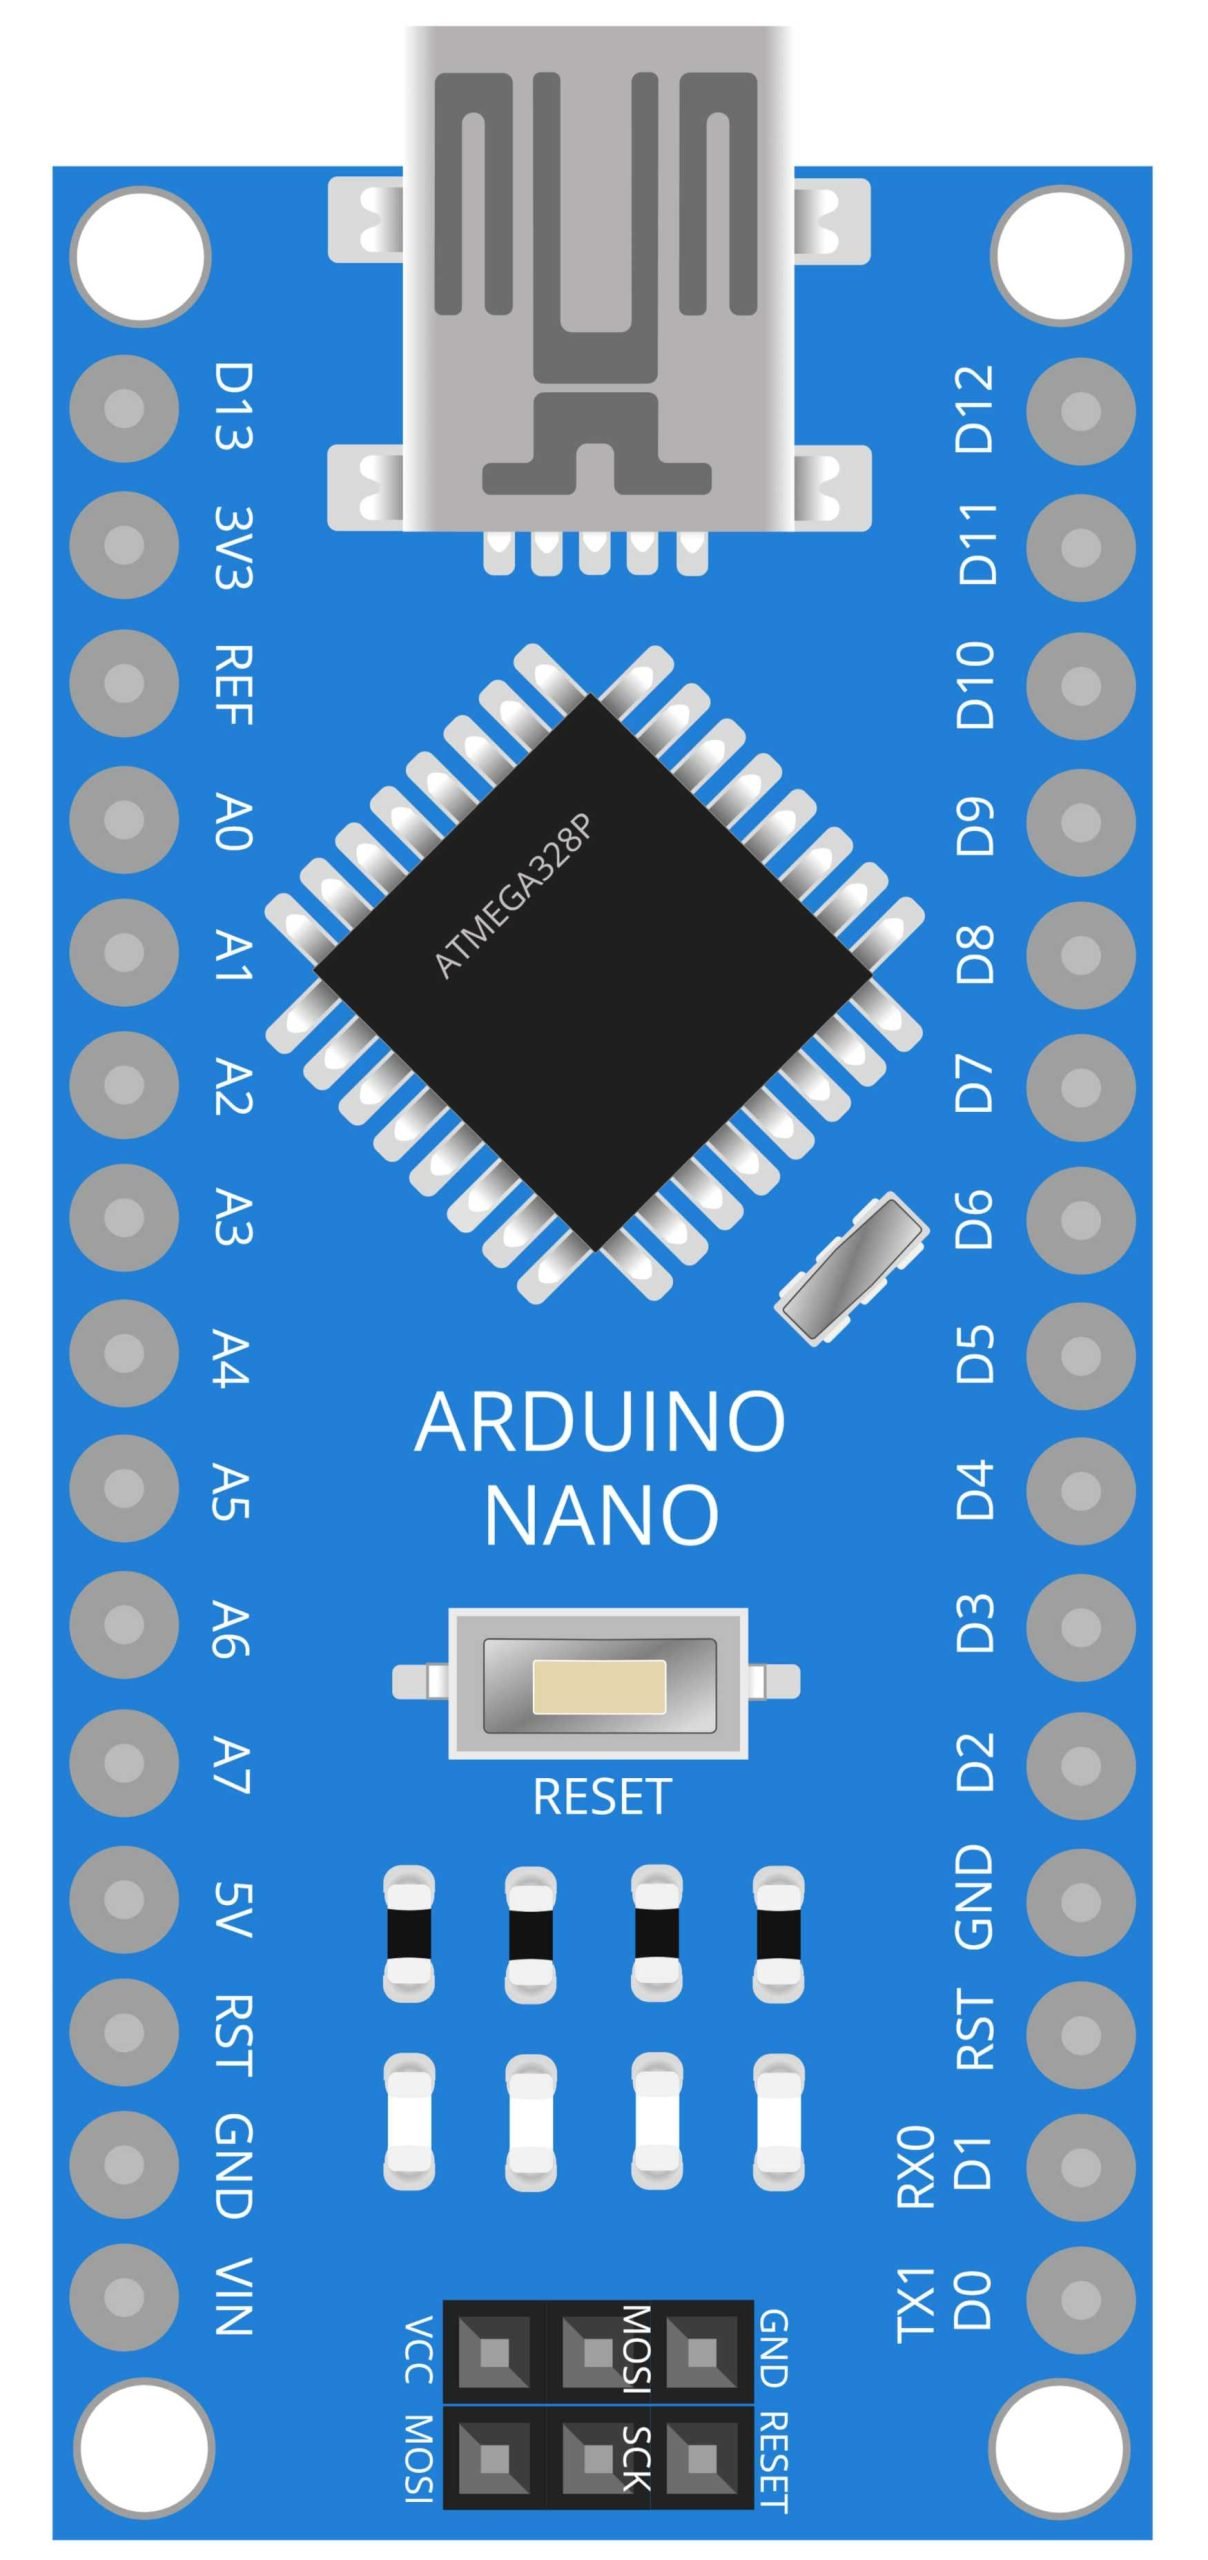
Arduino Nano
The Arduino UNO is a microcontroller board based on the ATmega328P. It has 14 digital input/output pins, 6 analog inputs, a 16 MHz quartz crystal, a USB connection, a power jack, an ICSP header and a reset button. The board is equipped with sets of digital and analog input/output (I/O) pins that may be interfaced to various expansion boards and other circuits. The boards are equipped with sets of digital and analog input/output (I/O) pins that may be interfaced to various expansion boards and other circuits.
In this project, the Arduino UNO board is used as the main controller for the project. The Arduino UNO board is responsible for reading the data from the SEN0219 Infrared CO2 Sensor and displaying it on the 0.96” SPI OLED Display. The Arduino UNO board also controls the reading of data from the sensor and the display of data on the OLED display. It is responsible for controlling the whole system and making it work as desired.
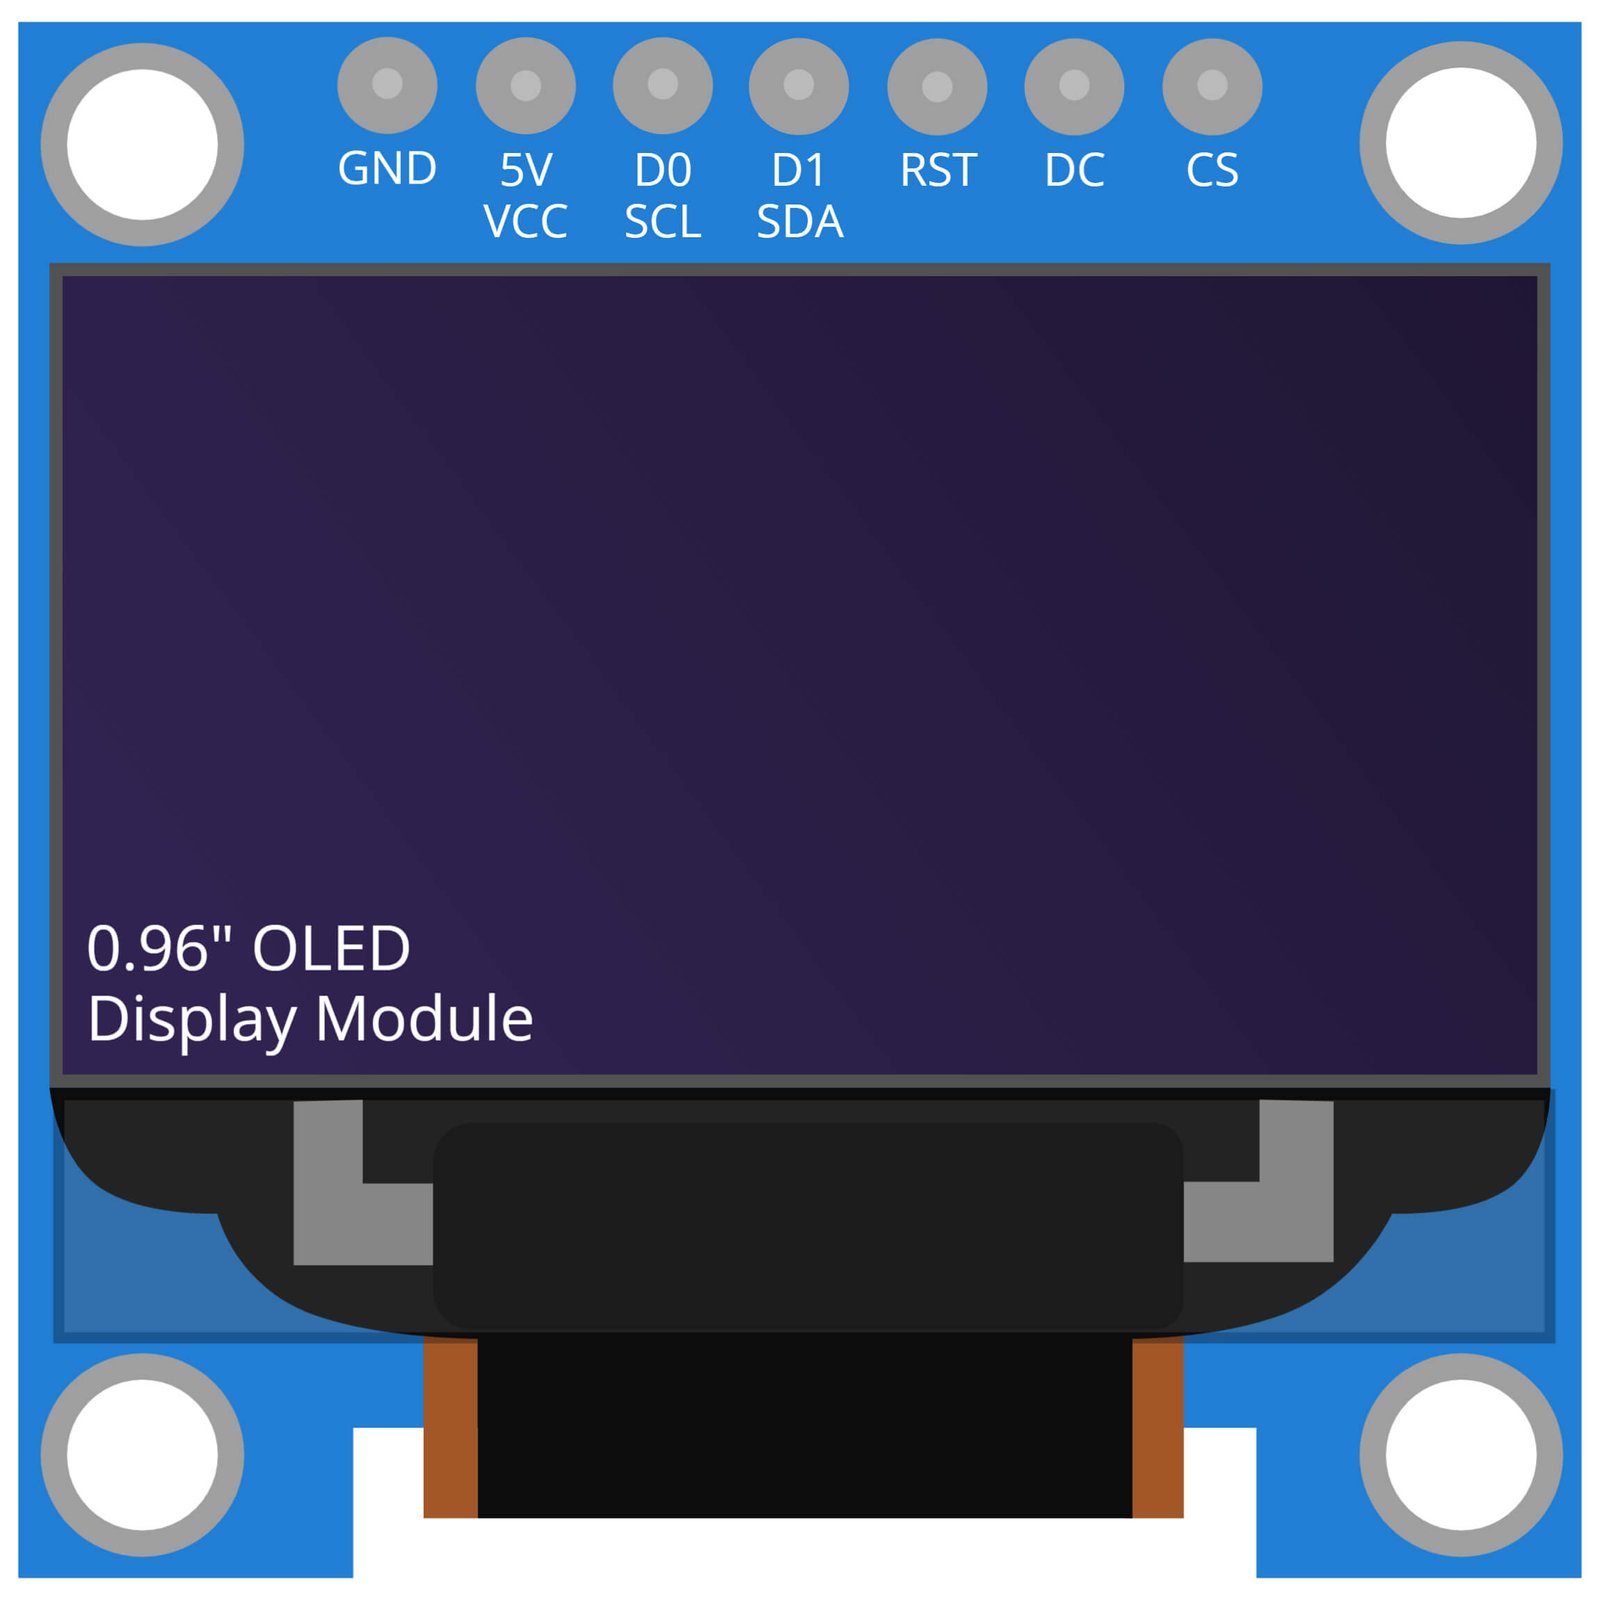
0.96 Inch OLED Display Module
The SEN0219 Infrared CO2 Sensor is a device that is used for measuring the concentration of carbon dioxide (CO2) in the air. It utilizes an infrared absorption technique to detect CO2 levels and can be used in a wide range of applications, including indoor air quality monitoring, greenhouse gas monitoring, and industrial process control. The sensor features a high sensitivity and accuracy, with a measurement range of 0 to 5000ppm and a resolution of 1ppm.
In this project, the SEN0219 Infrared CO2 Sensor is used to measure the CO2 levels in the air and display the results on the 0.96″ SPI OLED Display. The Arduino Nano acts as the main controller of the system, reading the data from the sensor and sending it to the OLED display to be displayed. The project provides a simple and low-cost way to monitor CO2 levels in a room or indoor space, and can be used to ensure a safe and healthy living environment. The project also helps to identify any potential issues related to indoor air quality, such as poor ventilation or the presence of mold.

SEN0219 Infrared CO2 Sensor
The SEN0219 Infrared CO2 Sensor is a non-dispersive infrared (NDIR) sensor designed for measuring the concentration of carbon dioxide (CO2) in the air. It is a small and compact sensor that uses infrared technology to detect the CO2 levels in the air. The sensor can measure CO2 concentration levels between 0 to 5000ppm with an accuracy of ±(50ppm+3%). It is also equipped with an automatic temperature compensation feature which ensures that the sensor’s readings are accurate and reliable even in changing temperature conditions.
In this project, the SEN0219 Infrared CO2 Sensor is used to measure the concentration of CO2 in the air. The sensor is connected to an Arduino Nano microcontroller, which reads the sensor’s output and displays the CO2 levels on a 0.96” SPI OLED Display. The project allows the user to monitor the CO2 levels in real-time and take necessary actions if the levels exceed a certain threshold. Additionally, the data can also be logged and analyzed for further study. This sensor can be used in the monitoring of indoor air quality and other applications where monitoring of CO2 levels is needed.
Steps and Info:
1. Get correct components as given. You can buy online or offline. I buy electronics components mostly from Amazon.
2. Start connecting the components. If you are new to connecting components in an electronic circuit, then use a Breadboard or you can straight up make connections using Jumper wires but it will create problem when there will be two or more connections needed at one pin (for example two or more different sensors 5V connection to Arduino’s 5V pin). But before soldering components on a PCB or printing a PCB for your circuit, better try using breadboard so that any errors and mistakes can be observed on breadboard and not after soldering. Or do connections in your way.
3. Now after building the circuit, download the Arduino IDE from https://www.arduino.cc/ website.
4. If you are new to Arduino IDE software, then watch this video we made specially for beginners about Arduino IDE.
5. If you know Arduino IDE then straight up copy the code we given and paste it into the Arduino IDE sketch.
6. Connect the Arduino to your Computer/device. Select a proper port, proper Arduino type and whatever other settings are. Here it is Arduino UNO. (If you don’t know what this all is then watch our video: ).
7. Compile the code and Upload it.
8. If any error occurs then try to troubleshoot it by finding/copy-pasting it into our Solve Errors page https://electronicsprojects.in/solve-errors/, or you can straight up paste the error on Internet and you know the rest. Also check if there are no spelling/syntax errors in the code. Compile the code again once to check if errors are fixed. I have given proper connections and code but still nothing is perfect.
9. Once code compiles and uploads smoothly, you can start testing the working of your circuit/project.
10. Check the 0.96” SPI OLED Display, you can see the current amount of CO2 in the atmosphere near the SEN0219 Gravity Infrared CO2 Sensor. The results will be in terms of Parts Per Million (PPM).
11. If it doesn’t work, then check connections and code. Also you can talk with me and the community through discord. All the links to social is given at the right side of this page.
Program Code:
/* https://www.electronicsprojects.in CO2 Monitor using Arduino, SEN0219 Gravity Infrared CO2 Sensor and 0.96” SPI OLED Display */

#include <SPI.h>
#include <Adafruit_GFX.h>
#include <Adafruit_SSD1306.h>
#define SCREEN_WIDTH 128
#define SCREEN_HEIGHT 64
#define OLED_MOSI   9
#define OLED_CLK   13
#define OLED_DC    11
#define OLED_CS    12
#define OLED_RESET 10
Adafruit_SSD1306 display(SCREEN_WIDTH, SCREEN_HEIGHT,
  OLED_MOSI, OLED_CLK, OLED_DC, OLED_RESET, OLED_CS);
  int sensorIn = A2;
void setup(){
  Serial.begin(9600);
  analogReference(DEFAULT);
  display.begin(SSD1306_SWITCHCAPVCC);
  display.clearDisplay();
  display.display();
}
void loop(){
  int sensorValue = analogRead(sensorIn);
  float voltage = sensorValue*(5000/1024.0);
  if(voltage == 0)
  {
    Serial.println("Bad");
  }
  else if(voltage < 400)
  {
    Serial.println("Getting ready");
  }
  else
  {
    int voltage_diference=voltage-400;
    float concentration=voltage_diference*50.0/16.0;
    Serial.print("voltage: ");
    Serial.print(voltage);
    Serial.println("mv");
    Serial.print("CO2 Concentration: ");
    Serial.print(concentration);
    Serial.println("ppm");
    display.setTextSize(2);
    display.setTextColor(WHITE);
    display.setCursor(18,43);
    display.println("CO2");
    display.setCursor(63,43);
    display.println("(PPM)");
    display.setTextSize(2);
    display.setCursor(28,5);
    display.println(concentration);
    display.display();
    display.clearDisplay();
  }
  delay(2000);
}