Description:
In the project we build Air Pollution Monitoring System using Arduino and SDS011 Nova PM Sensor. This is a simple air quality monitor which detects Particulate Matters in the air. Particulate Matter is also called as Particle Pollution. It is nothing but a mixture of solid particles and liquid droplets found in the air. Some particles, such as dust, dirt, soot, or smoke, are large or dark enough to be seen with the naked eye. PM 2.5 and PM 10 is measured in micrograms per cubic meter. PM 2.5 is the concentration of microscopic particles less than 2.5 microns in diameter and PM 10 is the concentration of microscopic particles less than 10 microns in diameter.
Here in this project we will be using Nova PM Sensor SDS011 to detect the Particulate Matter and display it on a 0.96’ SPI OLED Display. Everything will be controlled by Arduino UNO.
Circuit Diagram:

Components:
| SR. NO. | COMPONENT | PINOUT DIAGRAM | BUY |
|---|---|---|---|
| 1 | Arduino UNO (Other Arduinos can be used too) | Arduino UNO Pinout Diagram⇗ | |
| 2 | Nova PM Sensor SDS011 | ||
| 3 | 0.96″ OLED Display |
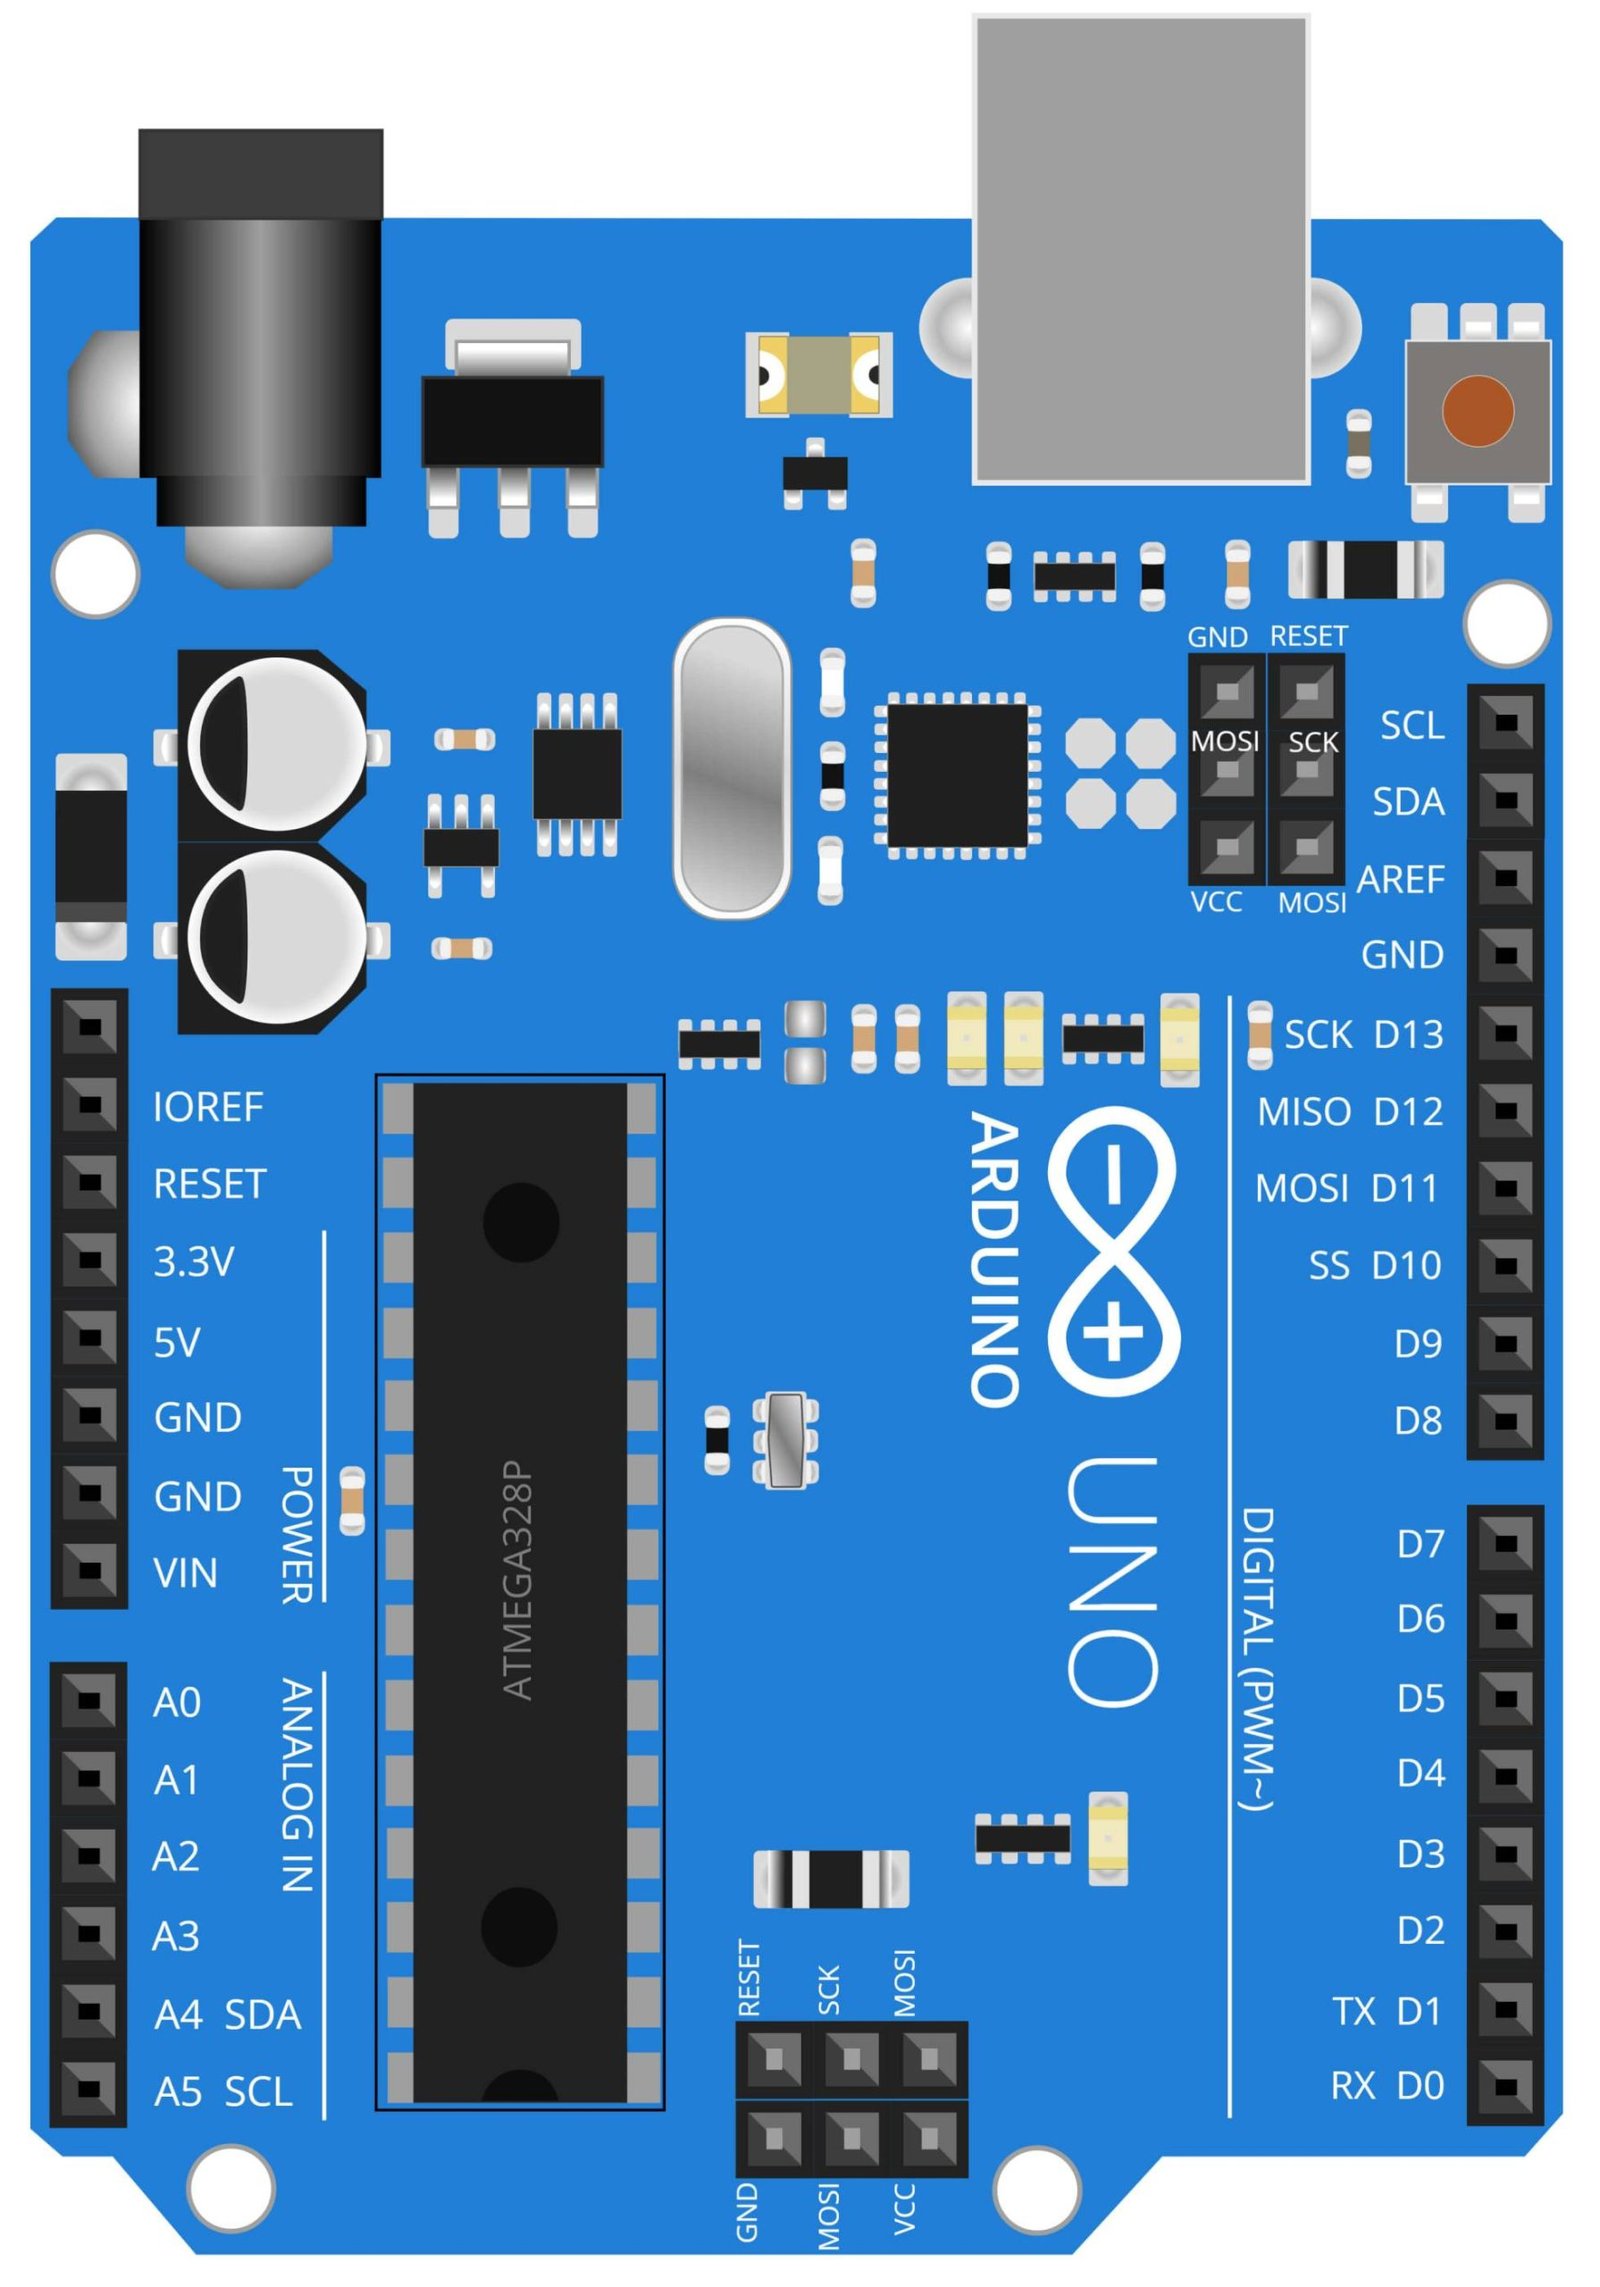
Arduino UNO
The Arduino UNO is a popular microcontroller board based on the ATmega328P microcontroller. It has 14 digital input/output pins, 6 analog inputs, a 16 MHz quartz crystal, a USB connection, a power jack, an ICSP header, and a reset button. The board is programmed using the Arduino Software (IDE), which is a free software that allows users to write, upload and execute code on the board.
In this project, the Arduino UNO is used as the main controller for the system. It receives data from the SDS011 Nova PM Sensor, which measures PM2.5 and PM10 levels, and processes this data to calculate the air quality index. The Arduino UNO then sends this data to the 0.96” OLED Display to be displayed in real-time. The UNO also controls the OLED Display, allowing the user to navigate through the menu and select different options. Overall, the Arduino UNO serves as the brain of the system, coordinating the actions of the other components and making the air pollution monitoring system possible.
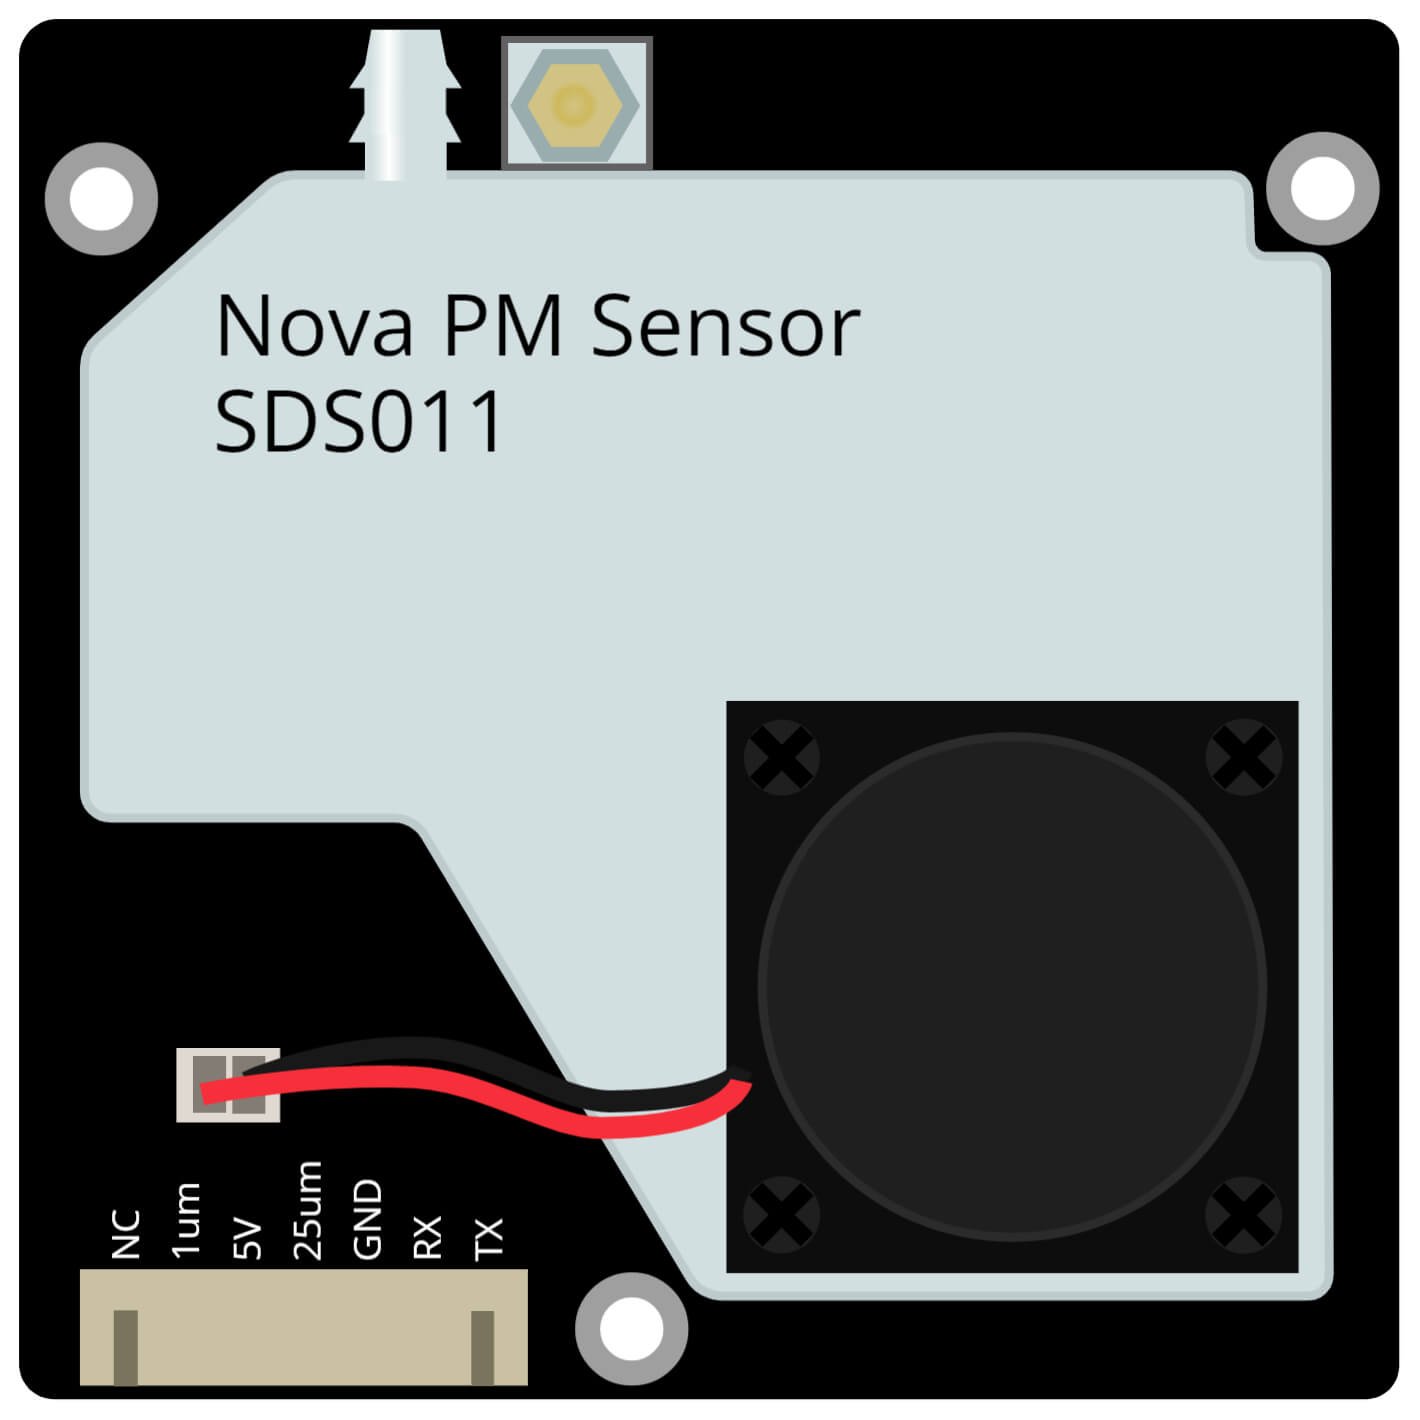
Nova PM Sensor SDS011
The SDS011 Nova PM Sensor is a digital and highly sensitive sensor that is used for measuring fine particulate matter (PM2.5 and PM10) in the air. It uses laser scattering to measure the number of particles in a given volume of air, and can detect particles as small as 0.3 micrometers. This makes it an ideal component for monitoring and measuring air pollution in various environments.
In this project, the SDS011 Nova PM Sensor is used to measure the level of PM2.5 and PM10 particulate matter in the air. The sensor is connected to an Arduino UNO microcontroller, which is responsible for collecting and processing data from the sensor. The data is then displayed on a 0.96” OLED display, allowing for real-time monitoring of air pollution levels. The system can be used to monitor air pollution in various environments such as homes, offices, and industrial areas, helping to identify sources of pollution and take steps to improve air quality.
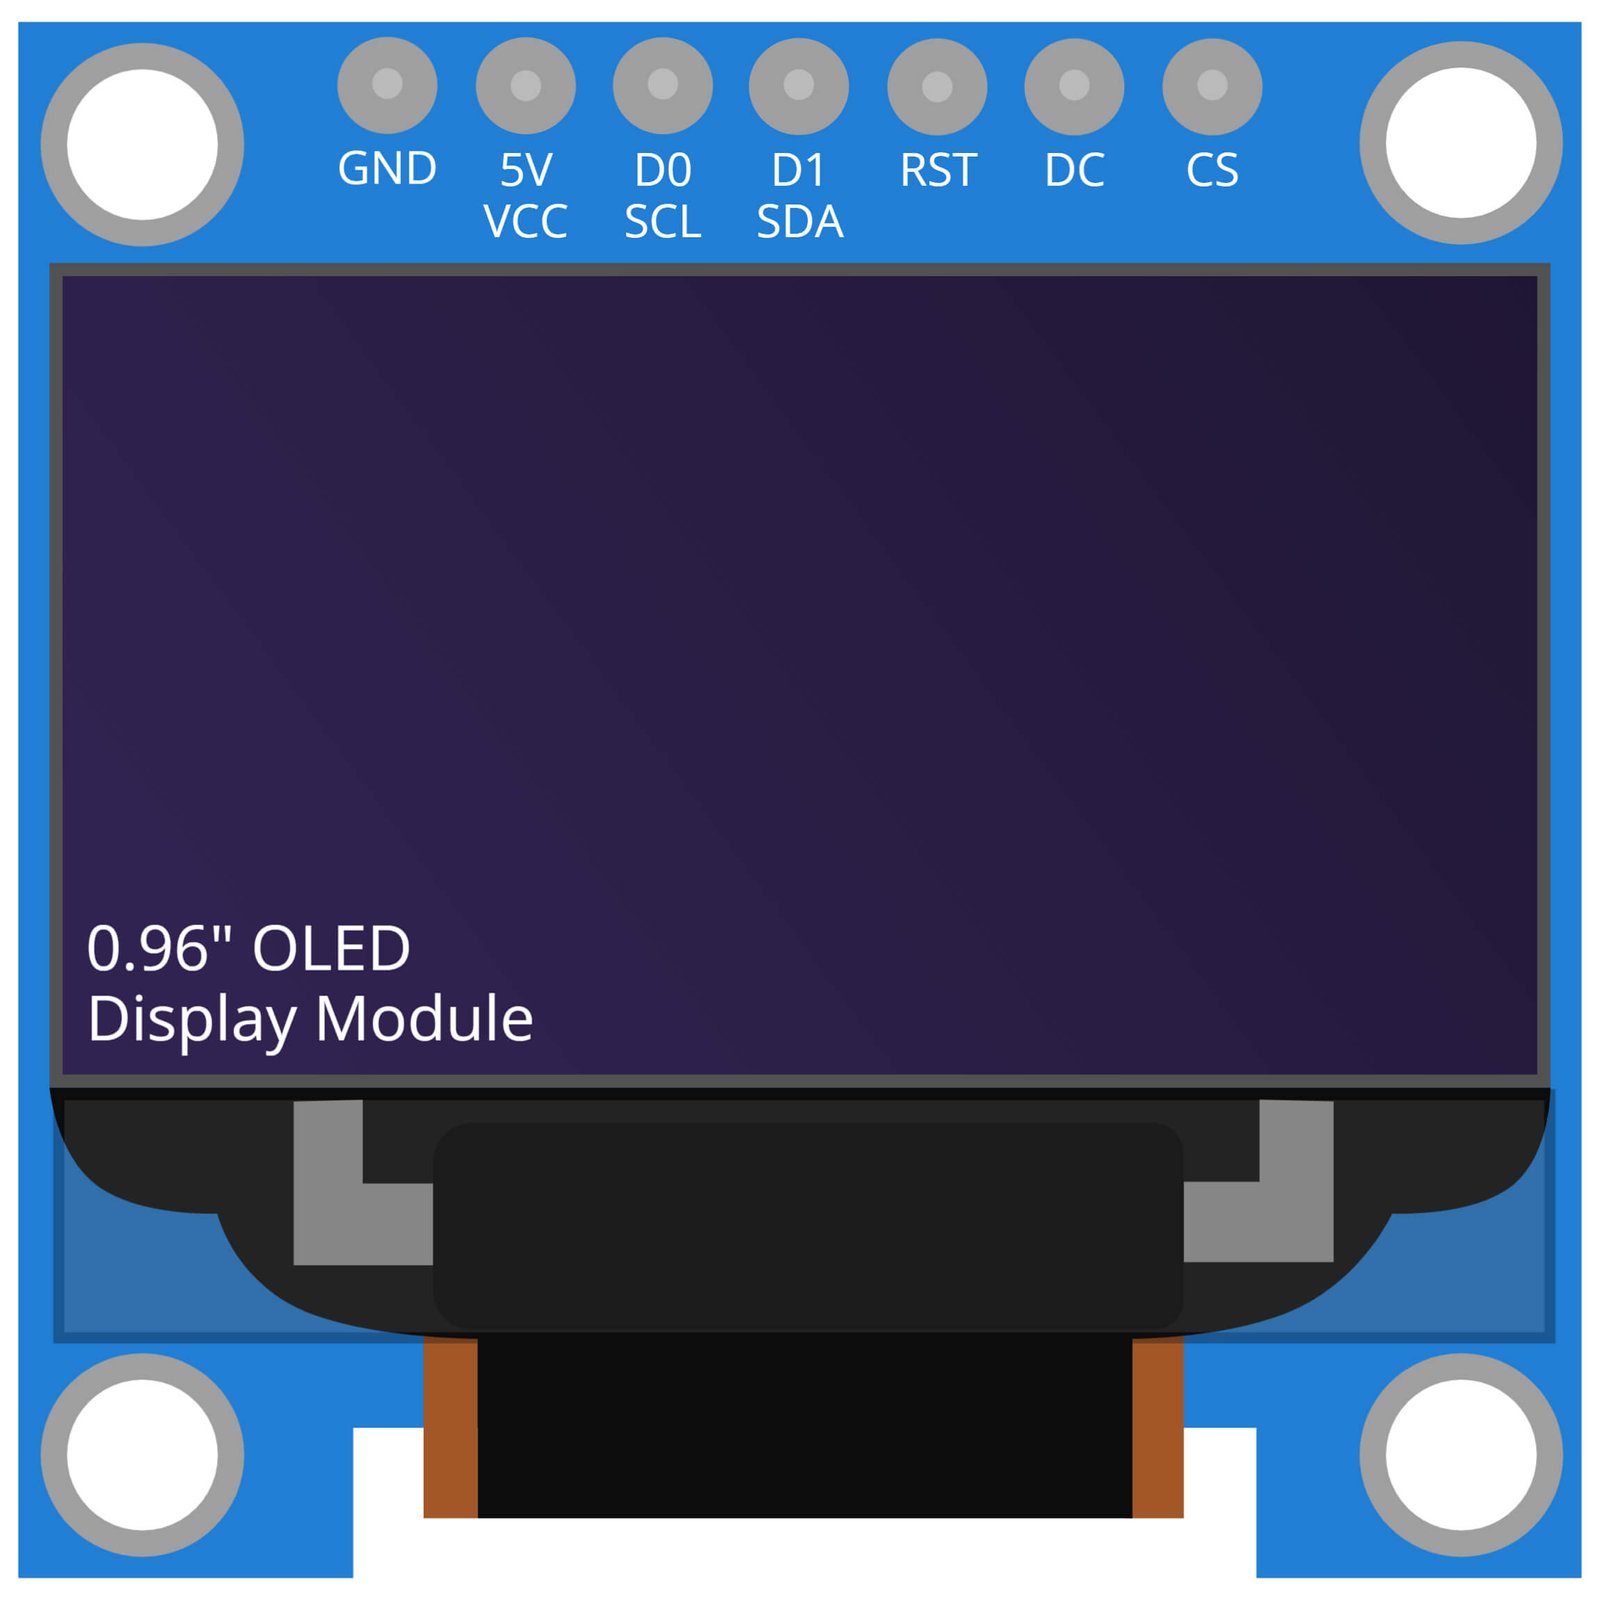
0.96 Inch OLED Display Module
An OLED (Organic Light Emitting Diode) display is a type of screen that uses organic compounds to produce light. The 0.96-inch OLED display module is a small, compact screen that can be easily integrated into various projects. One of the main benefits of OLED displays is their high contrast ratio, which results in deep blacks and vibrant colors. They also have fast response times and wide viewing angles, making them well suited for displaying text and images.
In this project, the 0.96-inch OLED display module is used to display the real-time PM 2.5 and PM 10 readings from the SDS011 Nova PM Sensor. The OLED display provides a clear and easy-to-read interface for the user to monitor the air quality in their surroundings. Additionally, the compact size of the OLED display allows for a compact and portable design for the overall system.
Steps and Info:
1. Get correct components as given. You can buy online or offline. I buy electronics components mostly from Amazon.
2. Start connecting the components. If you are new to connecting components in an electronic circuit, then use a Breadboard or you can straight up make connections using Jumper wires but it will create problem when there will be two or more connections needed at one pin (for example two or more different sensors 5V connection to Arduino’s 5V pin). But before soldering components on a PCB or printing a PCB for your circuit, better try using breadboard so that any errors and mistakes can be observed on breadboard and not after soldering. Or do connections in your way.
3. Now after building the circuit, download the Arduino IDE from https://www.arduino.cc/ website.
4. If you are new to Arduino IDE software, then watch this video we made specially for beginners about Arduino IDE.
5. If you know Arduino IDE then straight up copy the code we given and paste it into the Arduino IDE sketch.
6. Connect the Arduino to your Computer/device. Select a proper port, proper Arduino type and whatever other settings are. Here it is Arduino UNO. (If you don’t know what this all is then watch our video: ).
7. Compile the code and Upload it.
8. If any error occurs then try to troubleshoot it by finding/copy-pasting it into our Solve Errors page https://electronicsprojects.in/solve-errors/, or you can straight up paste the error on Internet and you know the rest. Also check if there are no spelling/syntax errors in the code. Compile the code again once to check if errors are fixed. I have given proper connections and code but still nothing is perfect.
9. Once code compiles and uploads smoothly, you can start testing the working of your circuit/project.
10. So turn ON the circuit, see the 0.96” SPI OLED Display, you will see the PM value of the atmosphere within the range of the SDS011 PM sensor. Try making small cloud of dust near the sensor and you will observe that the value of PM increases.
11. If it doesn’t work, then check connections and code. Also you can talk with me and the community through discord. All the links to social is given at the right side of this page.
Program Code:
/* https://www.electronicsprojects.in Air Pollution Monitoring Systems using Arduino, SDS011 Nova PM Sensor and 0.96” OLED Display */

#include <SDS011.h>
#include <SPI.h>
#include <Adafruit_GFX.h>
#include <Adafruit_SSD1306.h>
float p10,p25;
int error;
SDS011 nova;
#define SCREEN_WIDTH 128
#define SCREEN_HEIGHT 64
#define OLED_MOSI   9
#define OLED_CLK   8
#define OLED_DC    11
#define OLED_CS    12
#define OLED_RESET 10
Adafruit_SSD1306 display(SCREEN_WIDTH, SCREEN_HEIGHT,
  OLED_MOSI, OLED_CLK, OLED_DC, OLED_RESET, OLED_CS);
void setup() {
  nova.begin(3,4);
  Serial.begin(9600);
  display.begin(SSD1306_SWITCHCAPVCC);
  display.clearDisplay();
  display.display();
}
void loop() {
  error = nova.read(&p25,&p10);
  if (! error) {
    Serial.println("P2.5: "+String(p25));
    Serial.println("P10:  "+String(p10));
    display.setTextSize(2);
    display.setTextColor(WHITE);
    display.setCursor(0,15);
    display.println("PM2.5");
    display.setCursor(67,15);
    display.println(p25);
    display.setCursor(0,40);
    display.println("PM10");
    display.setCursor(67,40);
    display.println(p10);
    display.display();
    display.clearDisplay();
  }
  delay(100);
}